Welcome to the second part of the DevOps from Scratch series!
In this section, we’ll cover Terraform and deploying to Amazon. I’m assuming that you’ve already completed the first part of the tutorial or have cloned the devops-from-scratch repo.
Cloud Deploy Preparation with Amazon
Create an Amazon account if you don’t have one yet. Our work should be eligible under the free tier if you’ve never done something with Amazon. Even if you have, it shouldn’t cost much unless you leave it running forever.
Now, sign into your Amazon AWS console. You should see something like this:
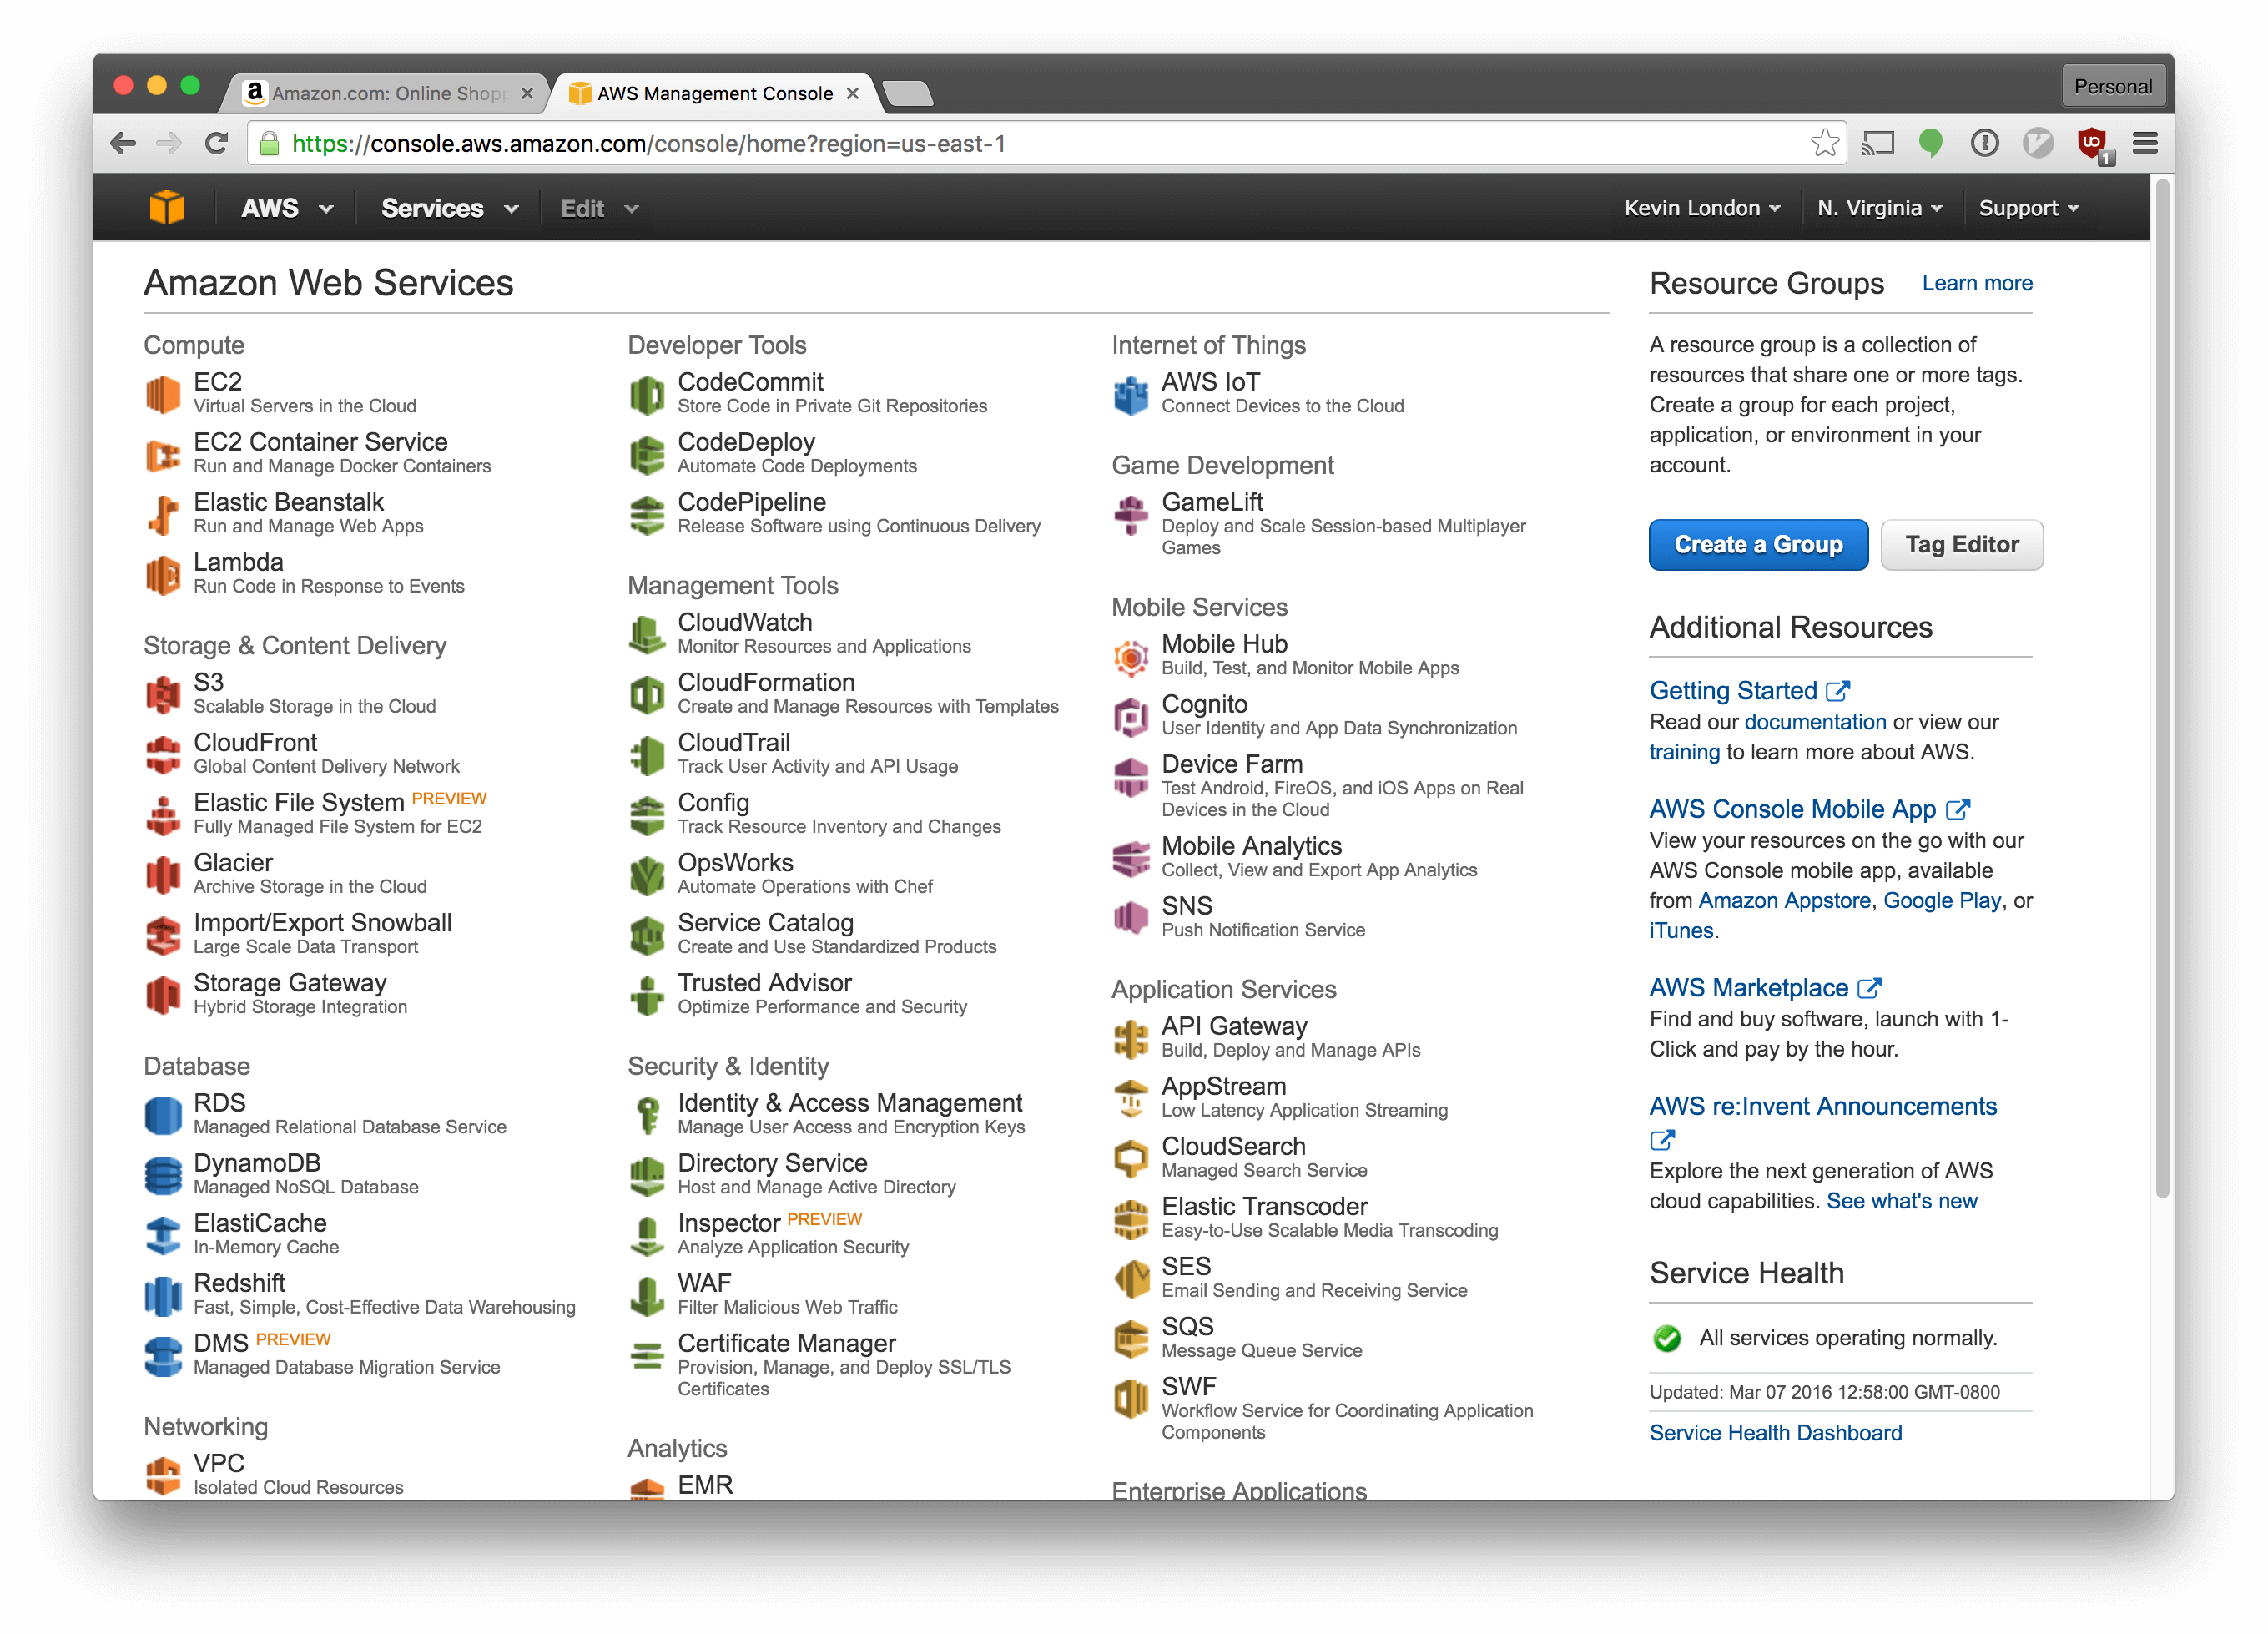
Make sure the dropdown in the top right says “N. Virginia”. If not, select it and switch to N. Virginia (a.k.a. US-East-1 in Amazon parlance).
Let’s create a new server. Amazon generally refers to individual servers as instances, so we’ll use that terminology too.
Select “EC2” from the list of services.
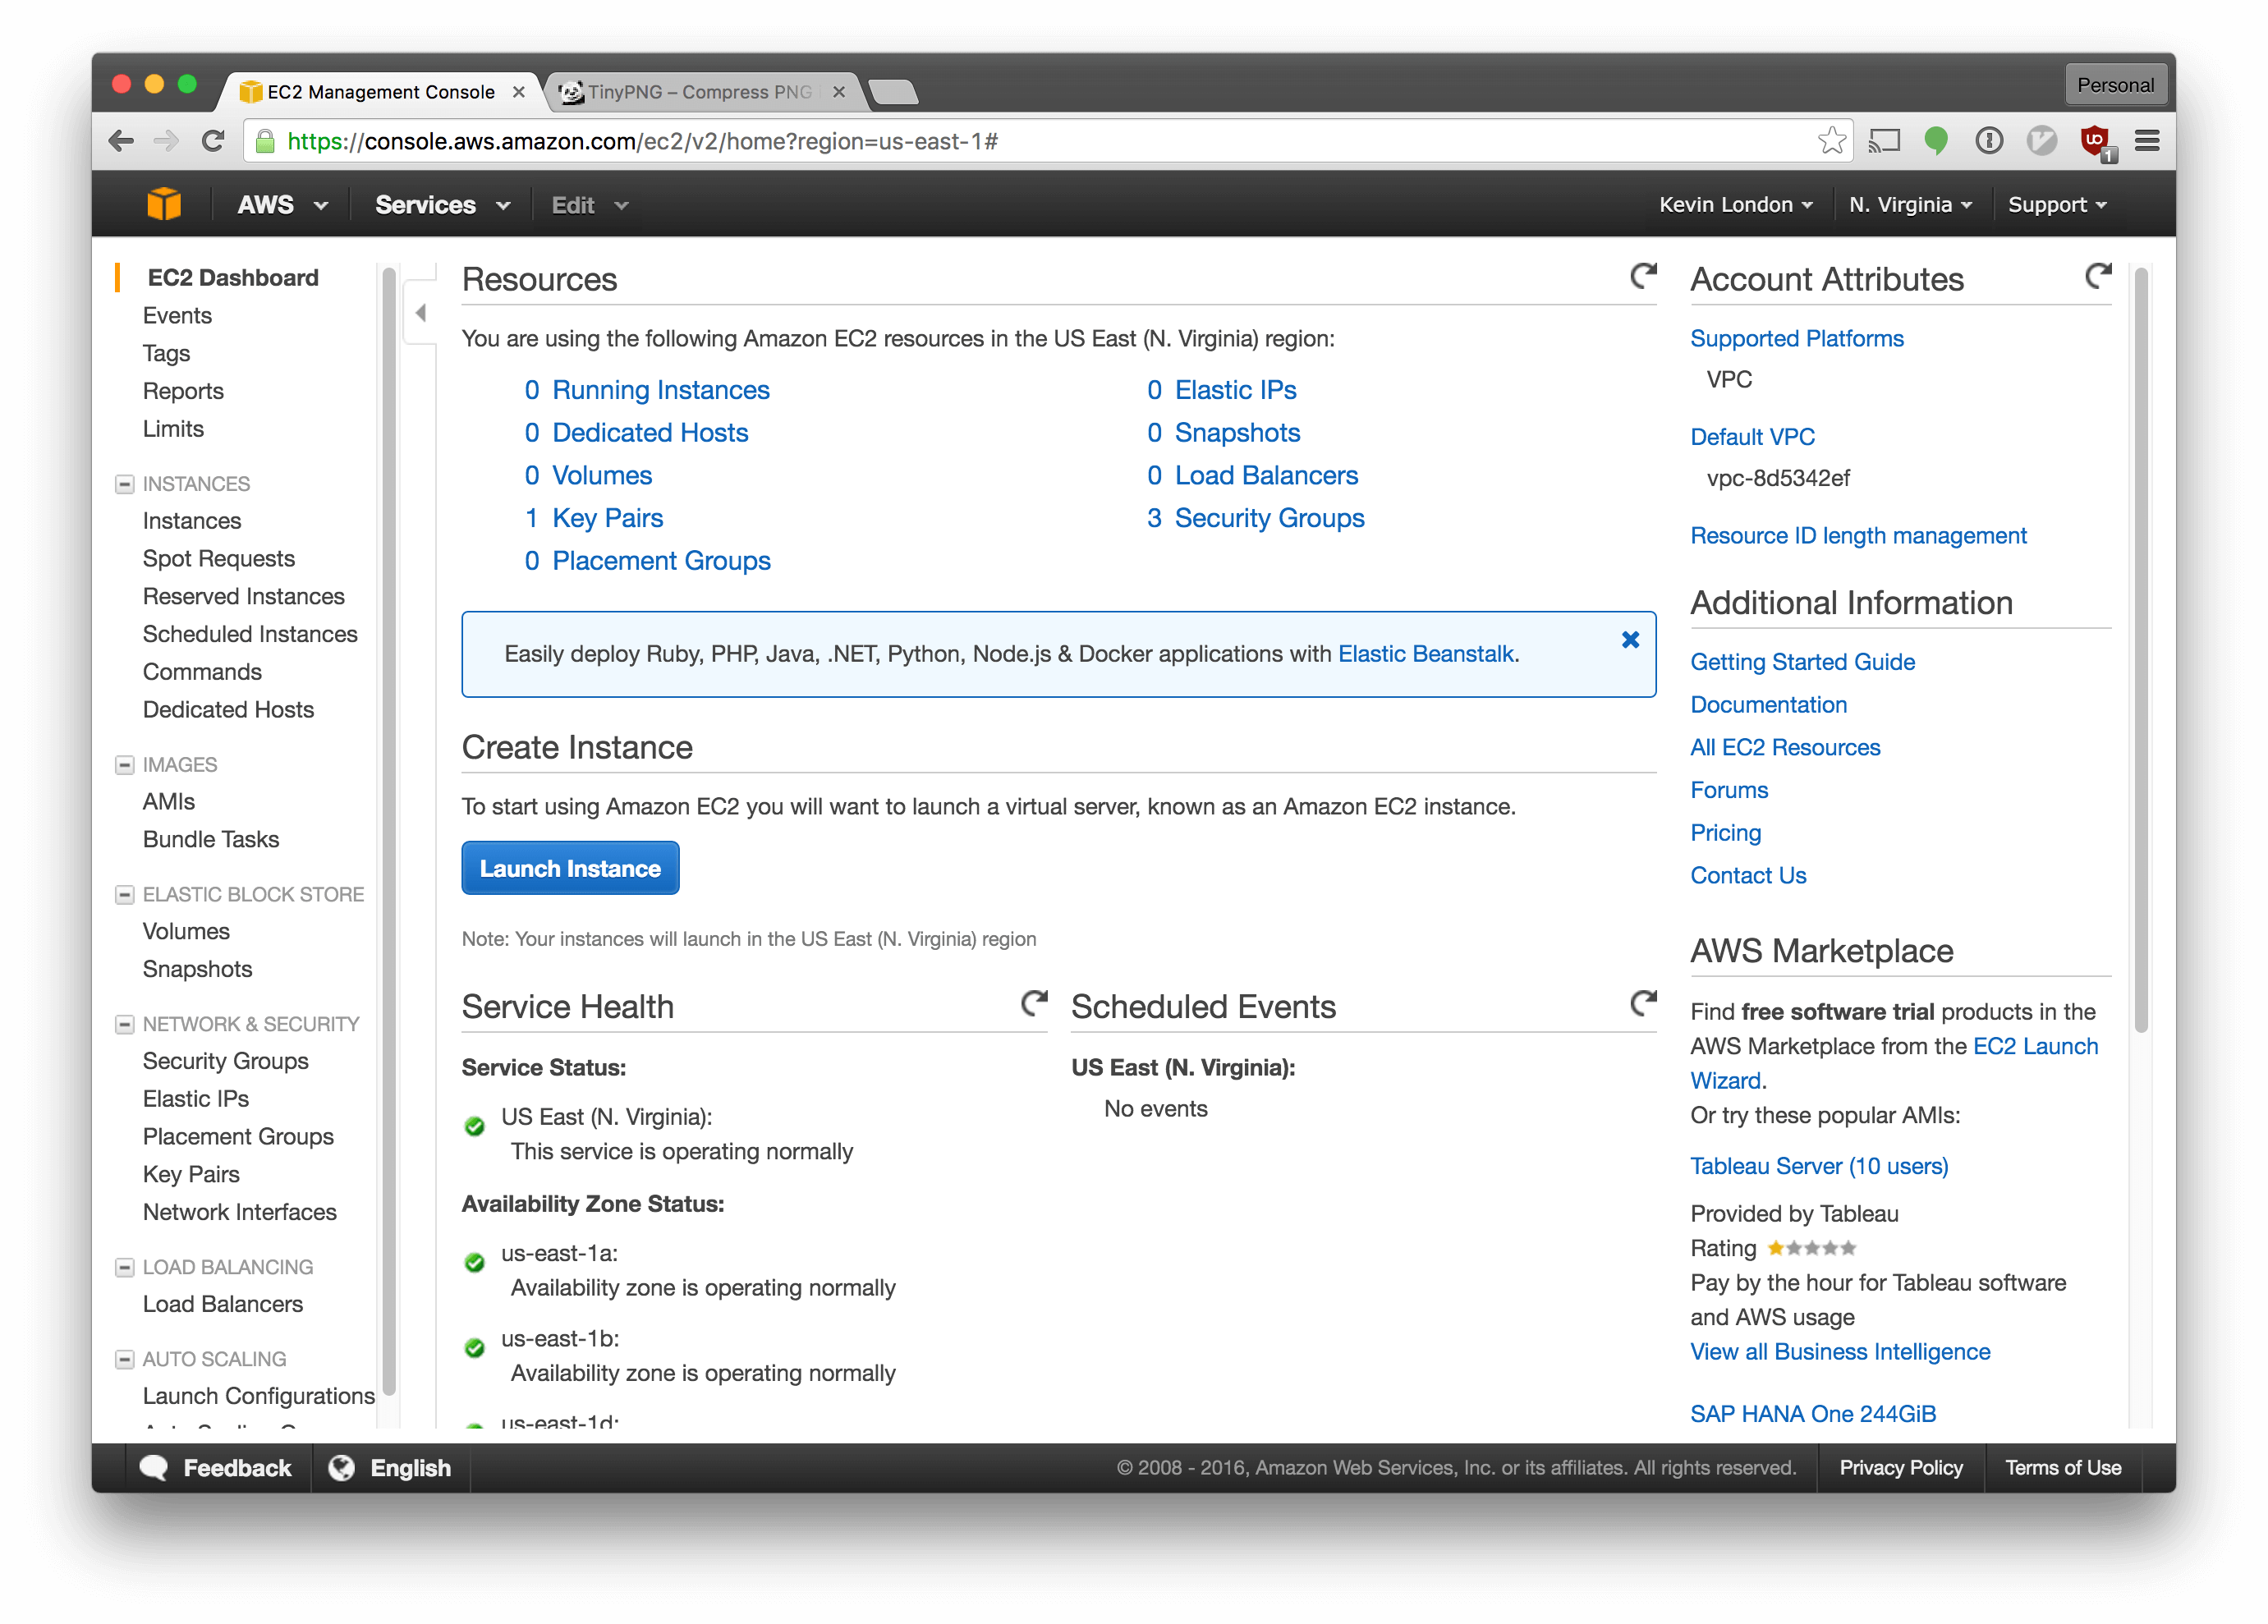
In the EC2 menu, click “Launch Instance”.
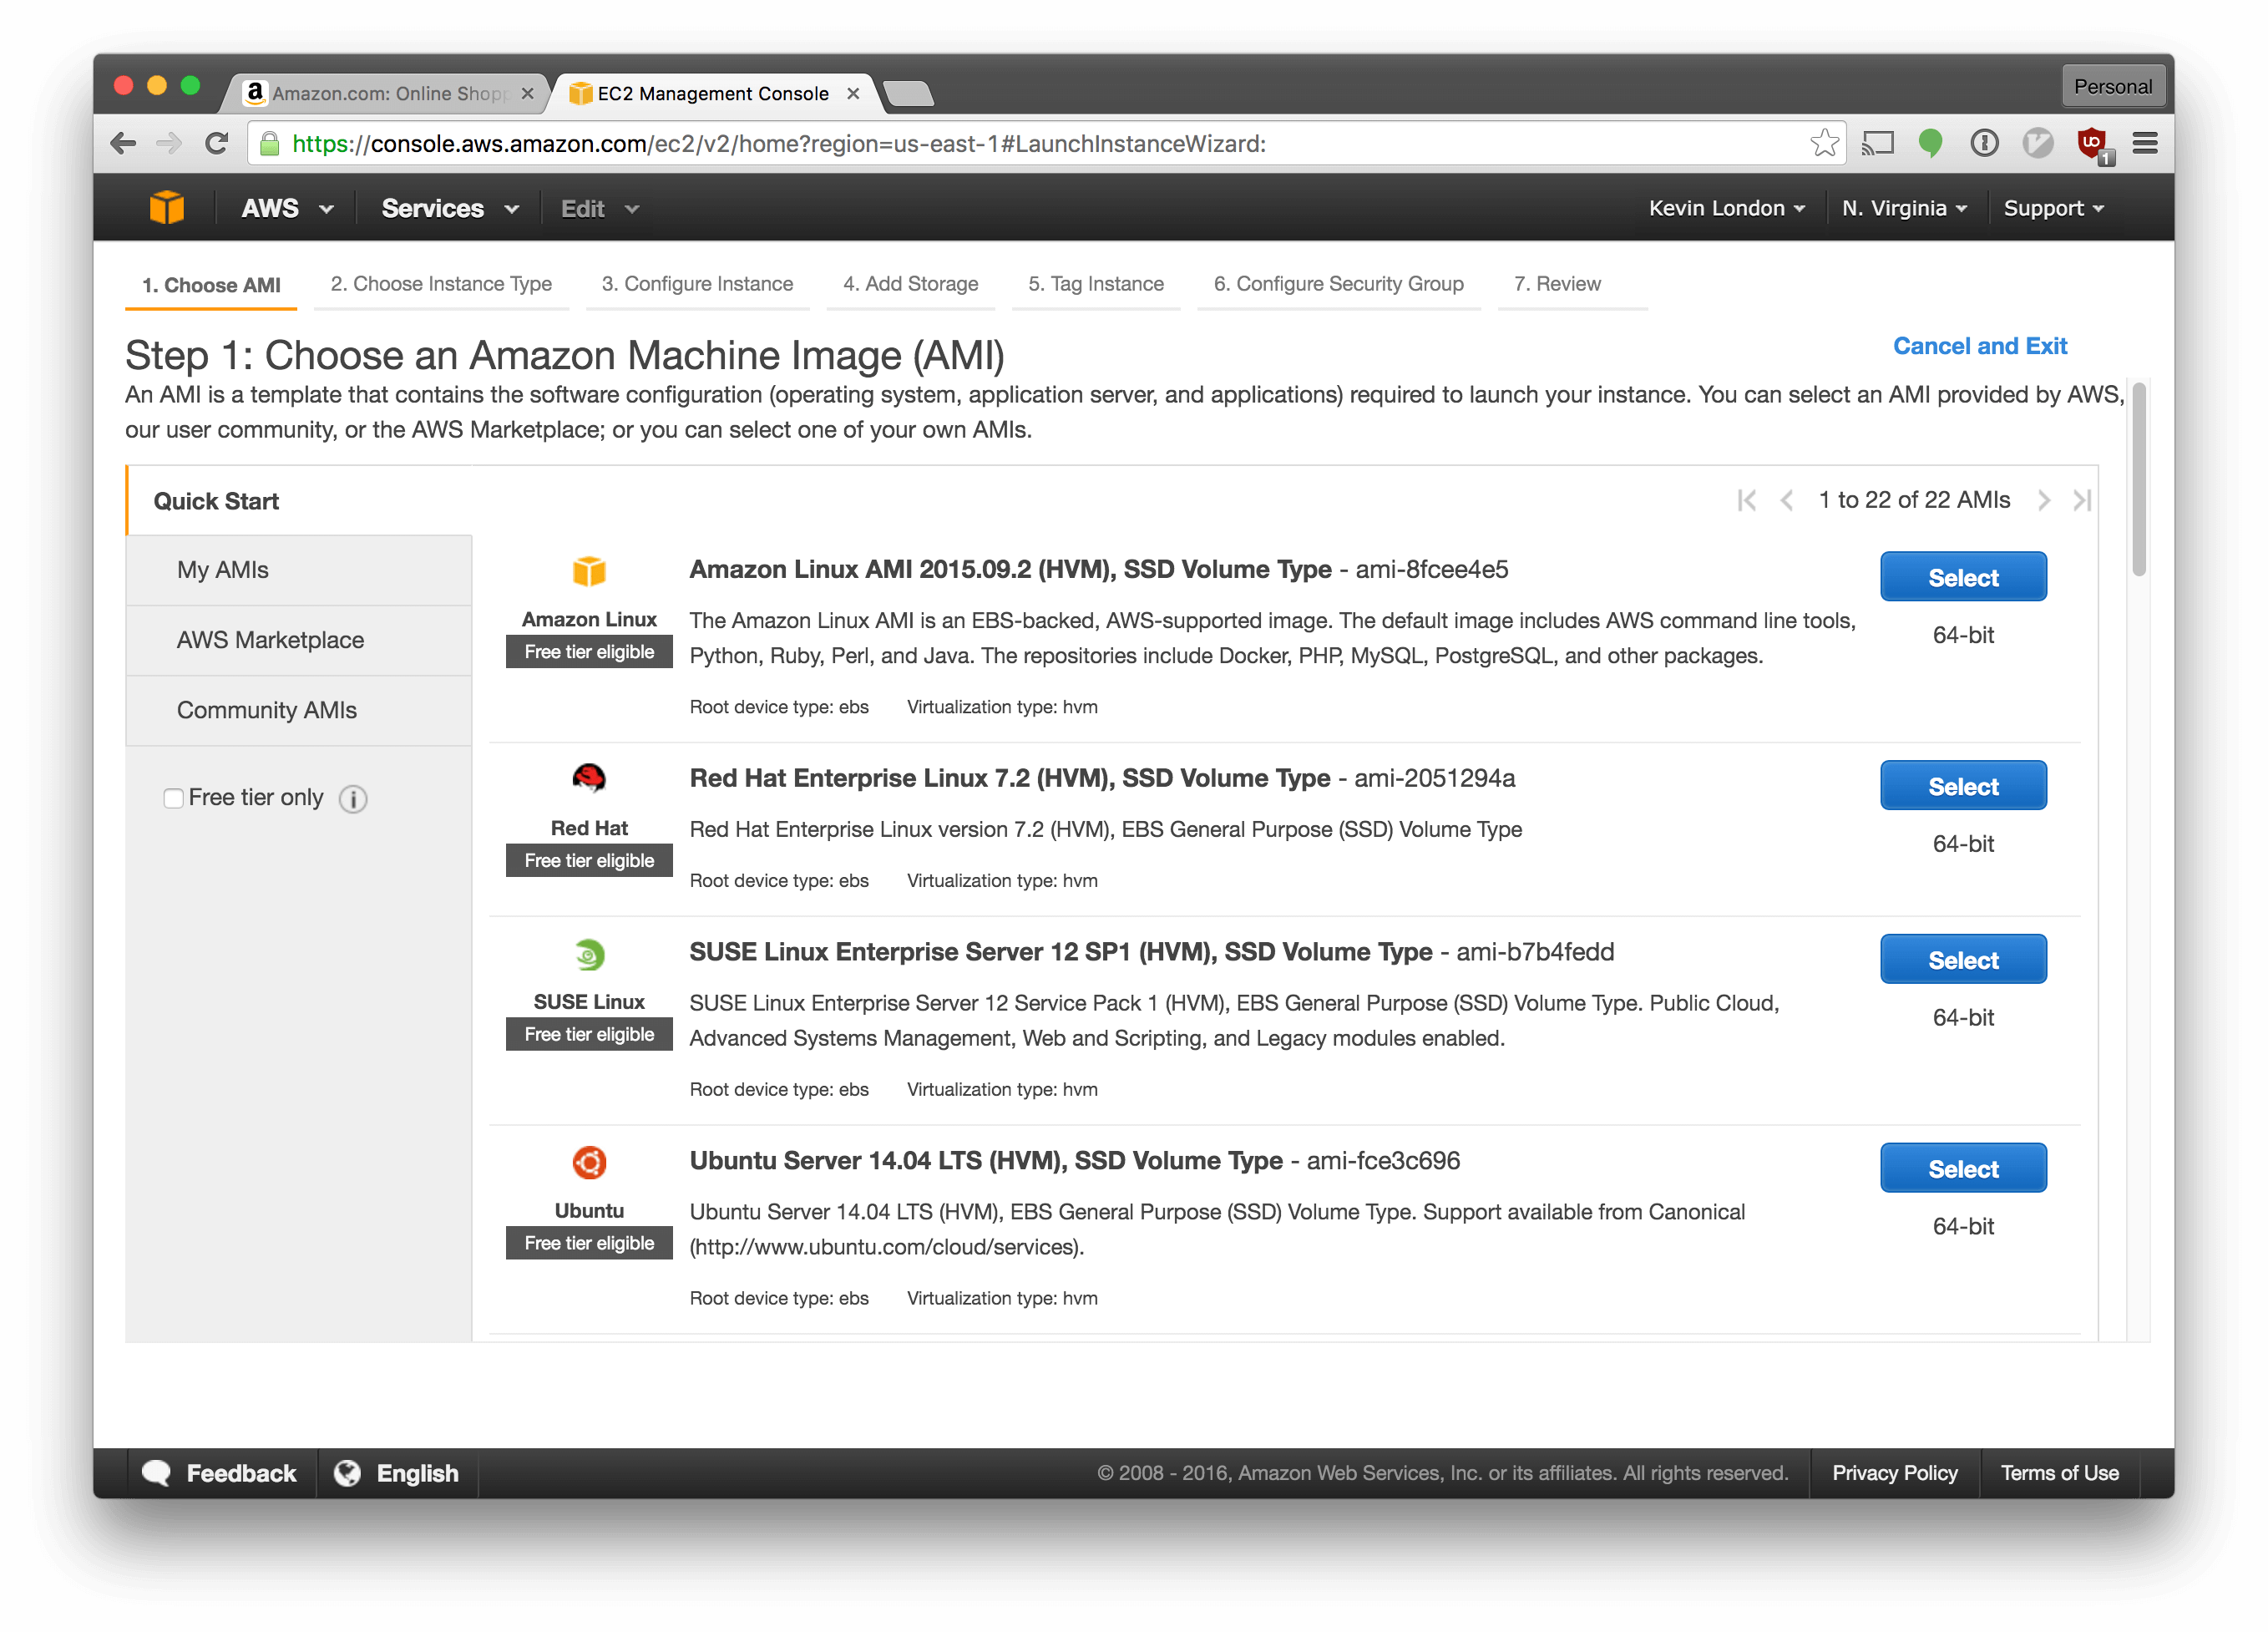
Select “Ubuntu Server 14.04 LTS (HVM), SSD Volume Type - ami-fce3c696”. We’re using the same type of OS as we used for our VM.
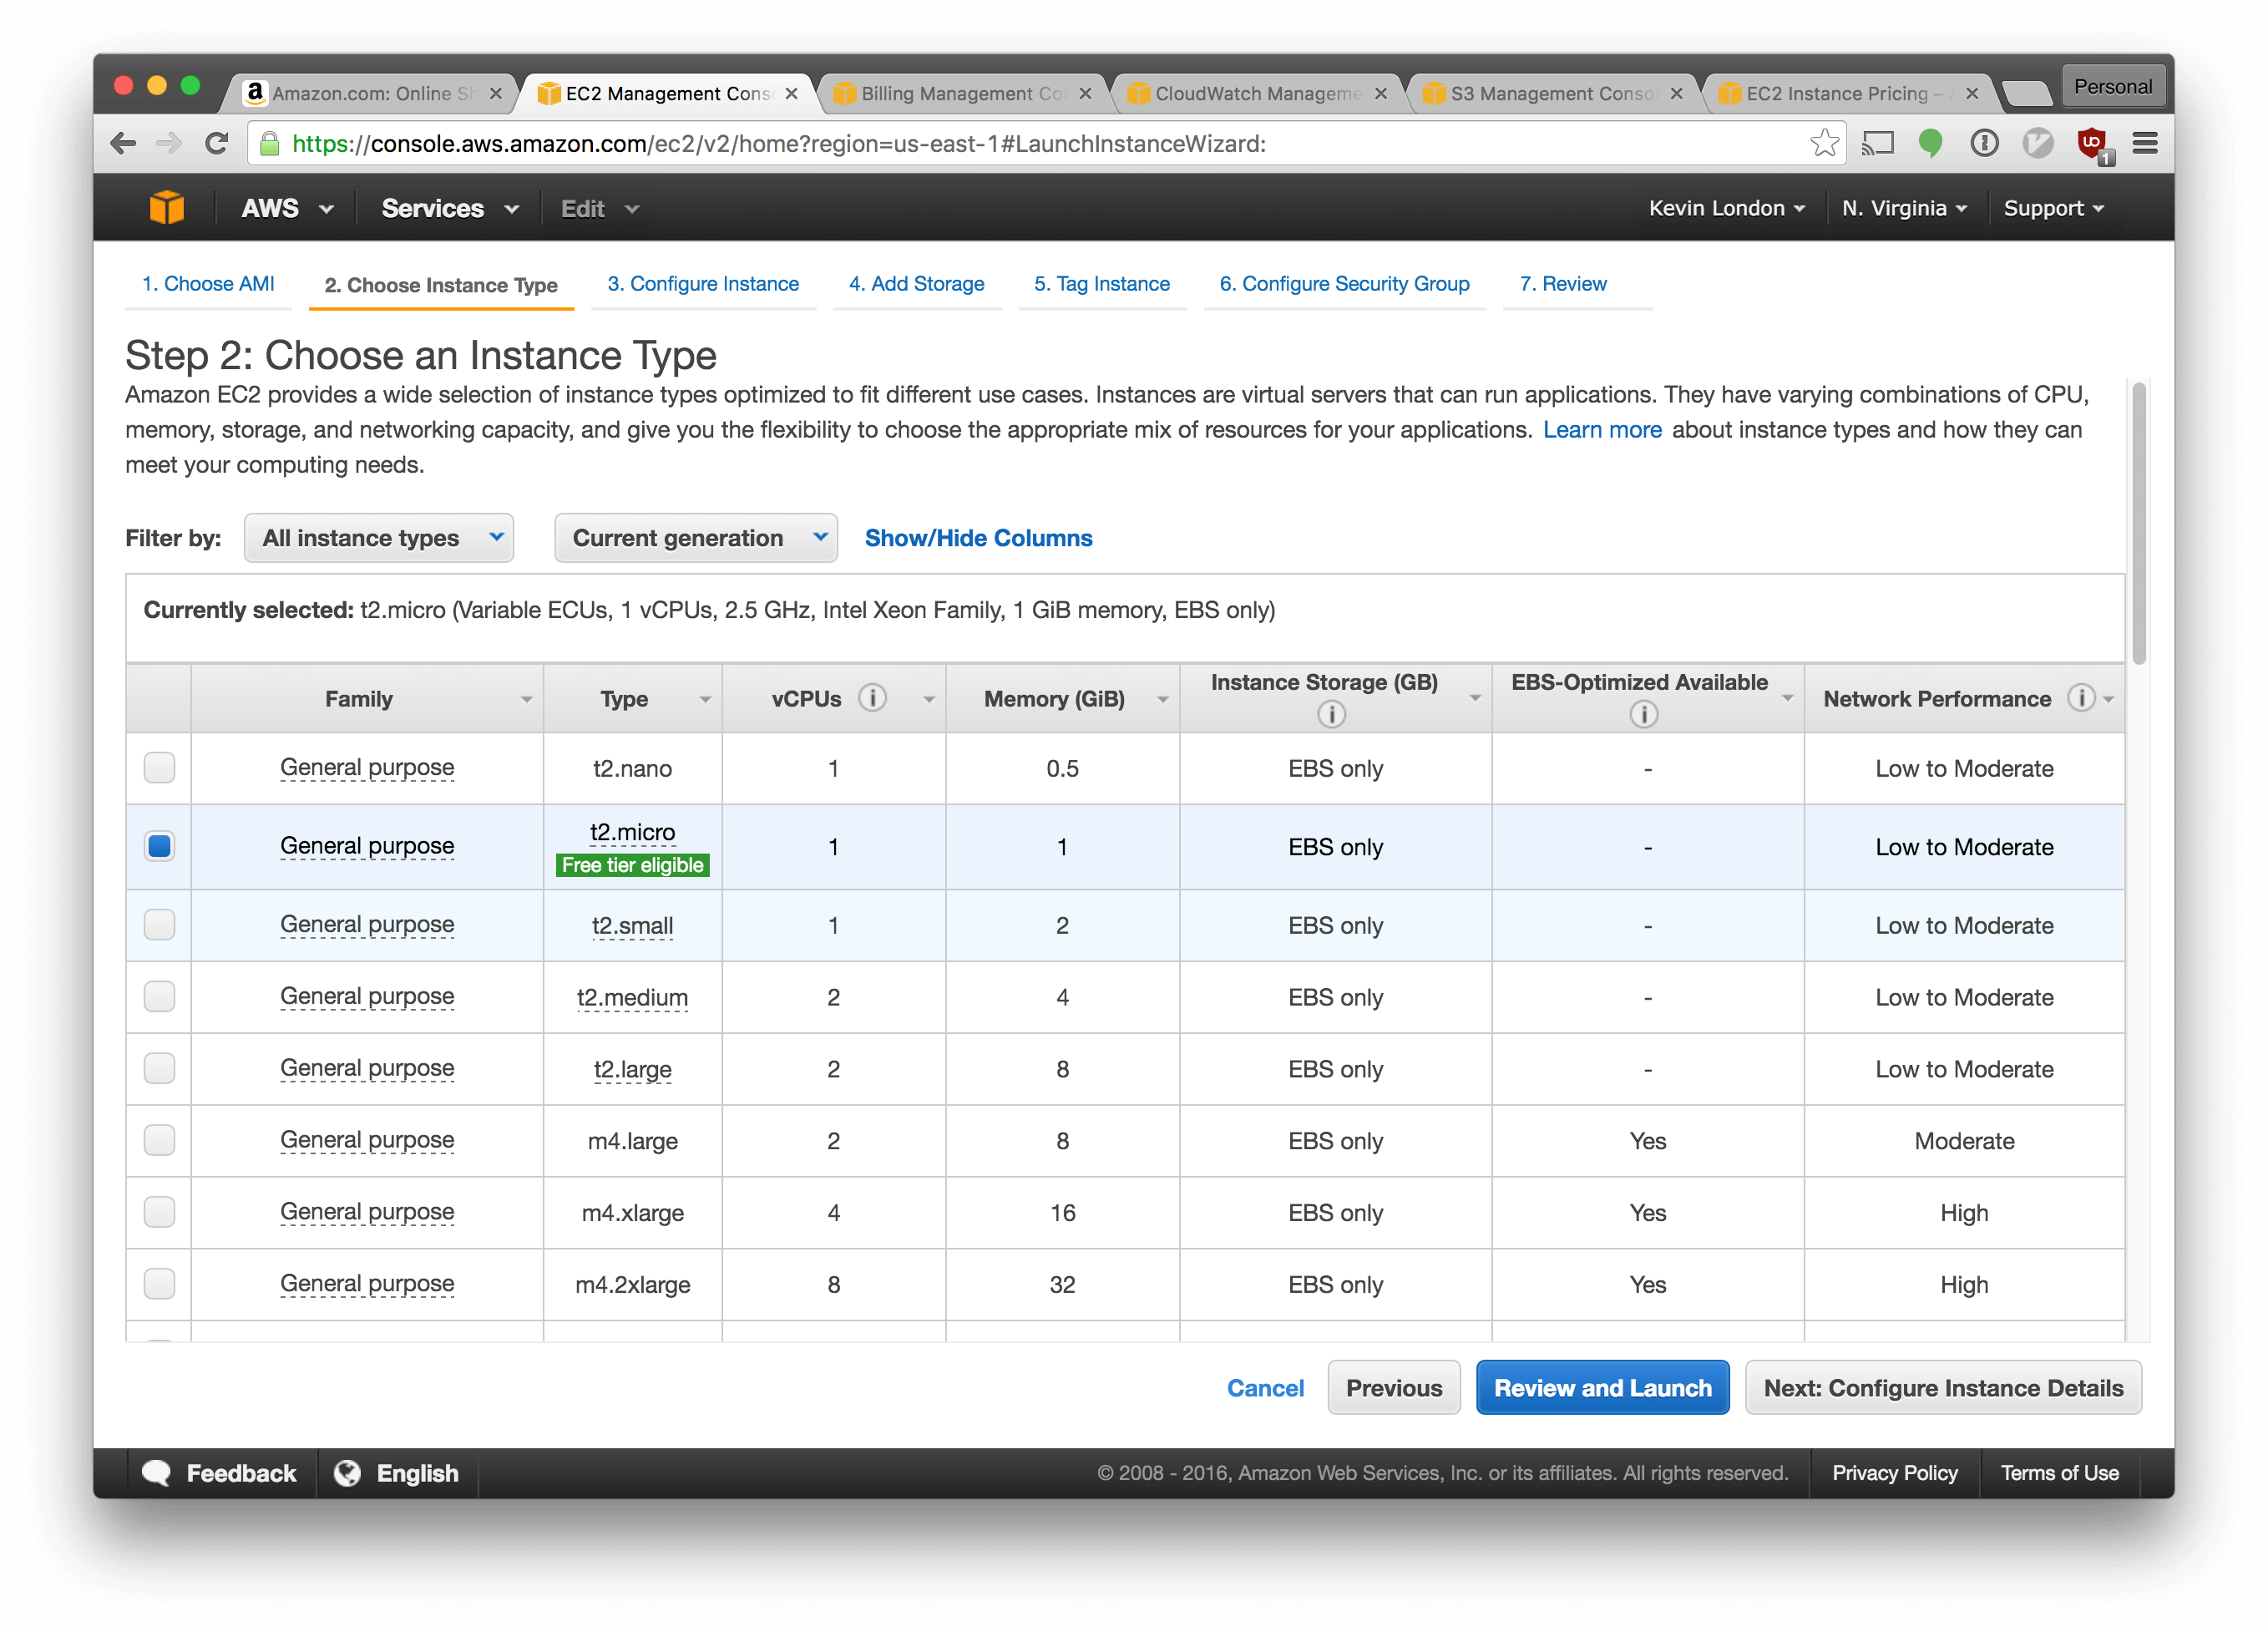
Choose “t2.micro”, which is a small, free tier-eligible instance type. Click “Review and Launch”.
There’s some warnings on the next screen. They’re valid, but we’re going to ignore them for now.
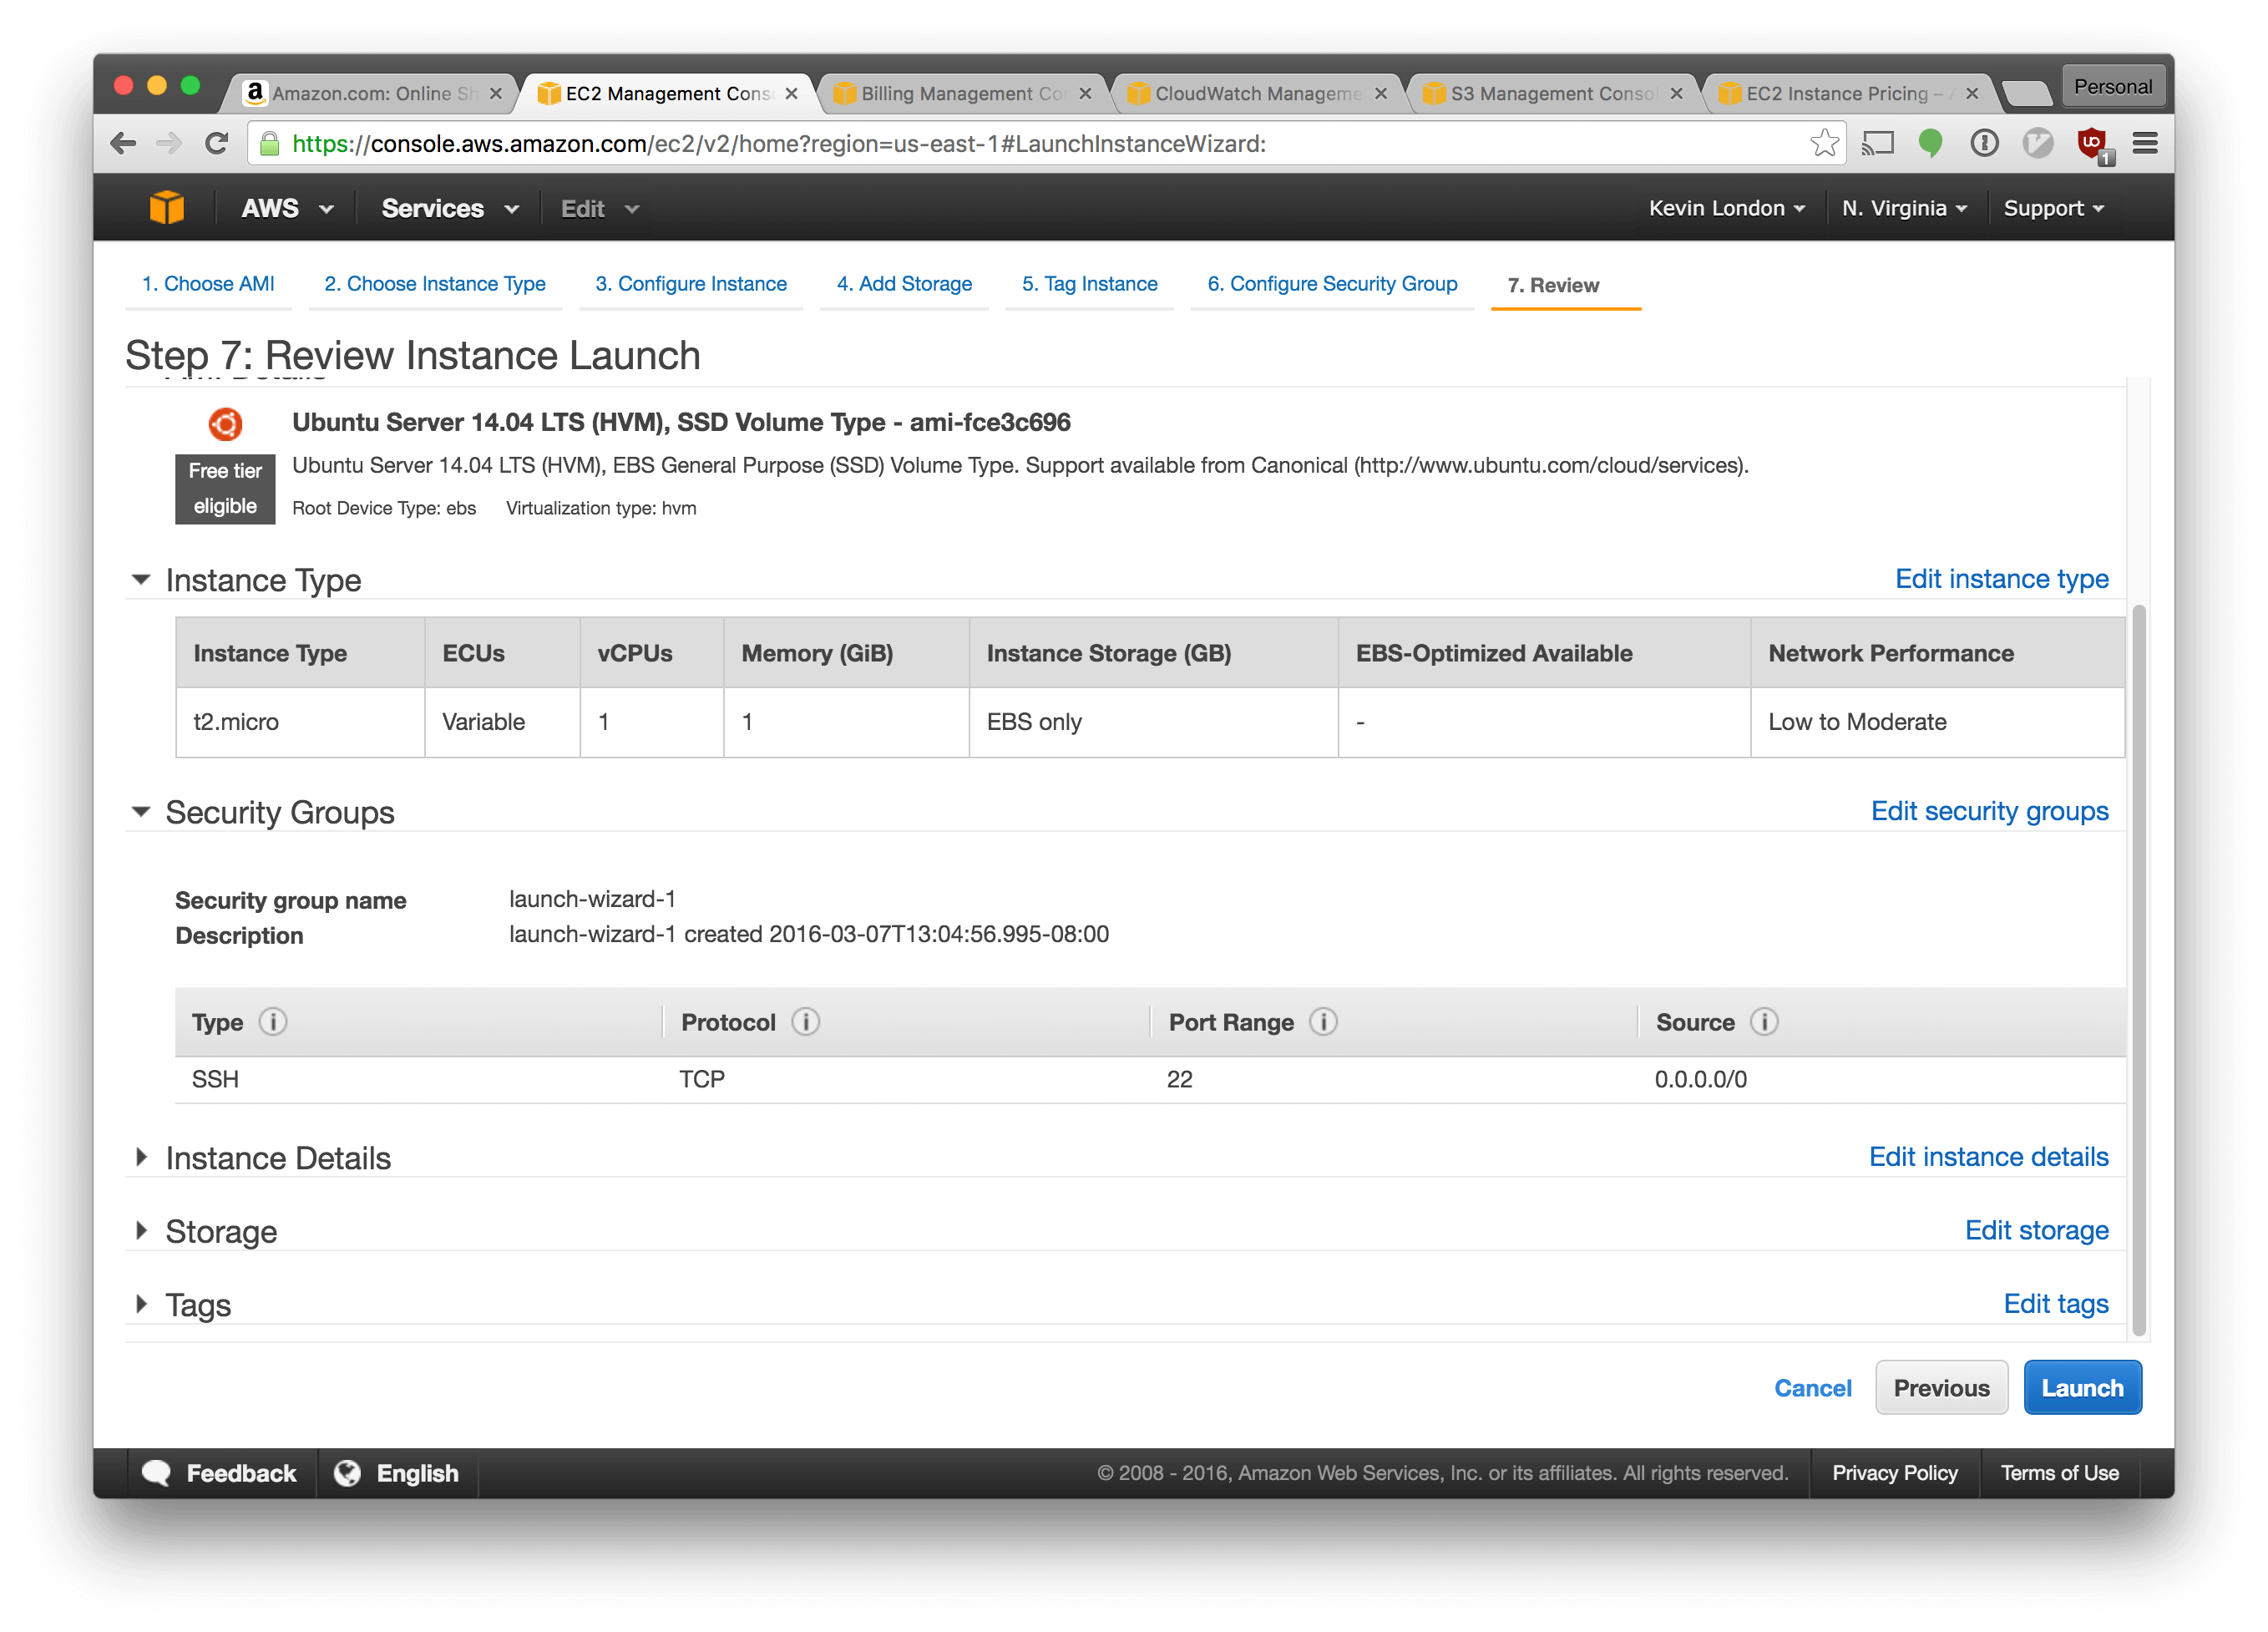
Click “Launch”.
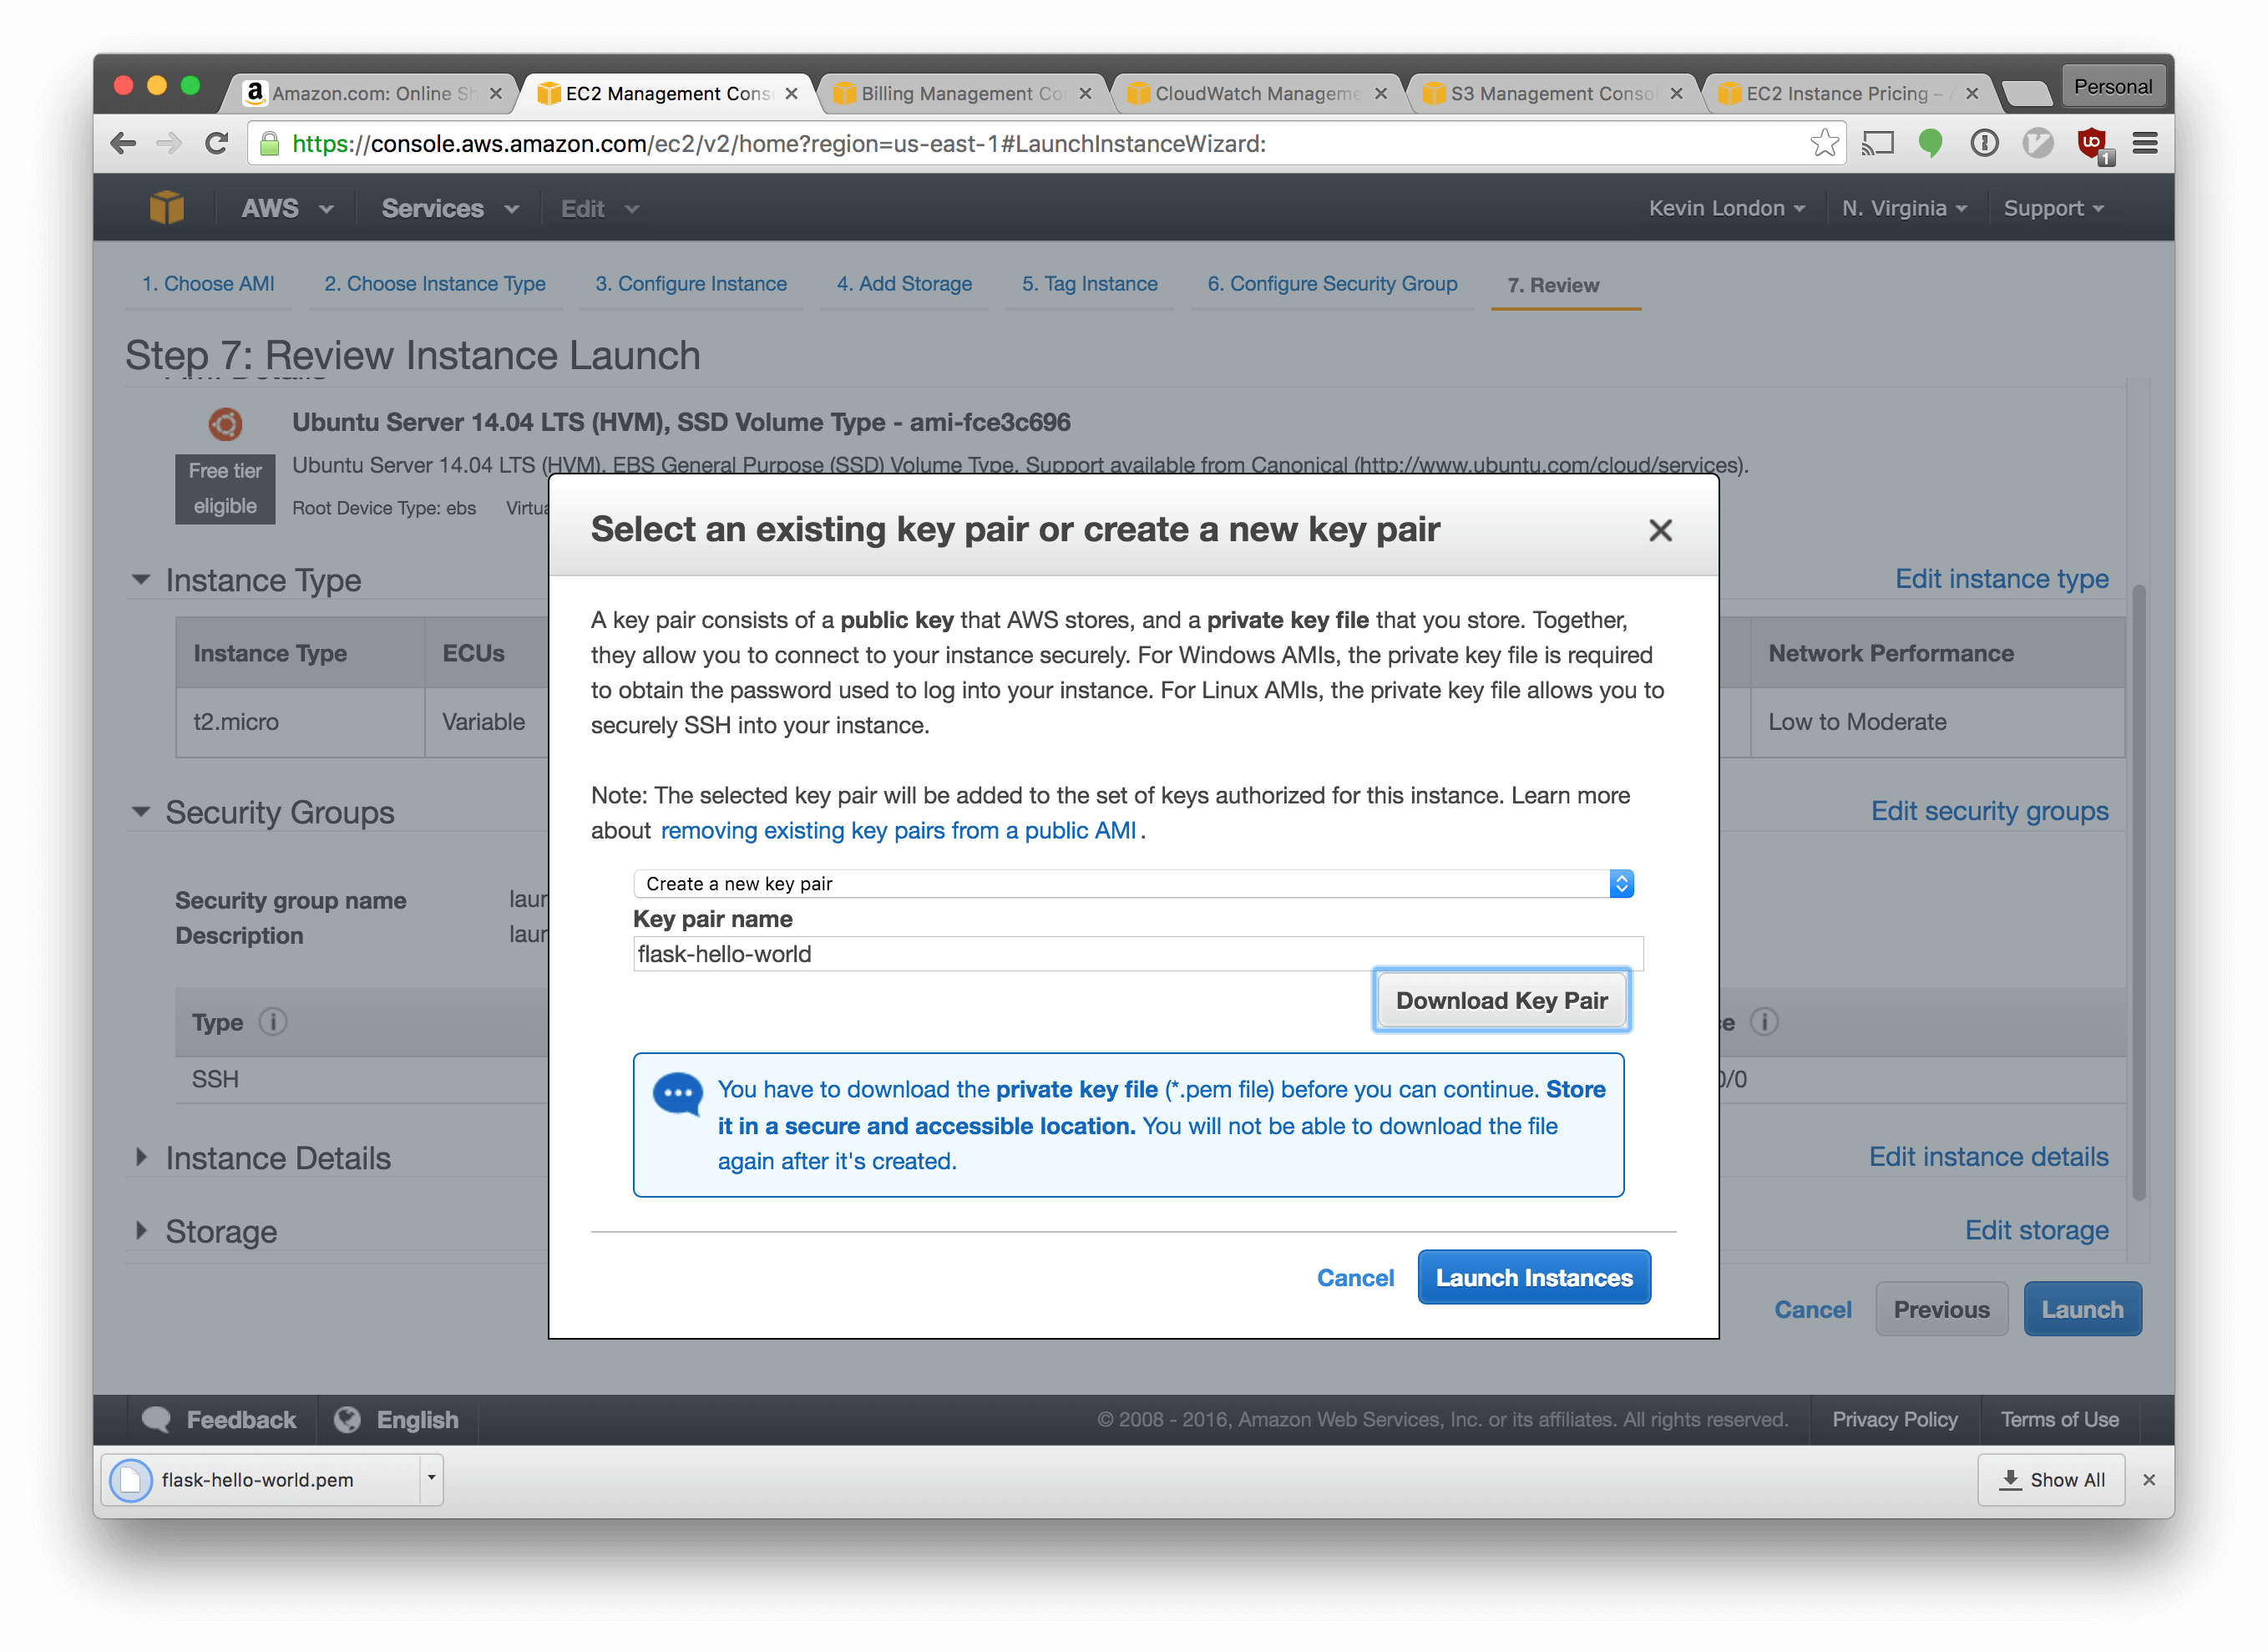
In the next screen, select “Create a new key pair”. Name it flask-hello-world
and click “Download Key Pair”. Then click “Launch Instances”.
Congratulations! We’ve launched our first instance.
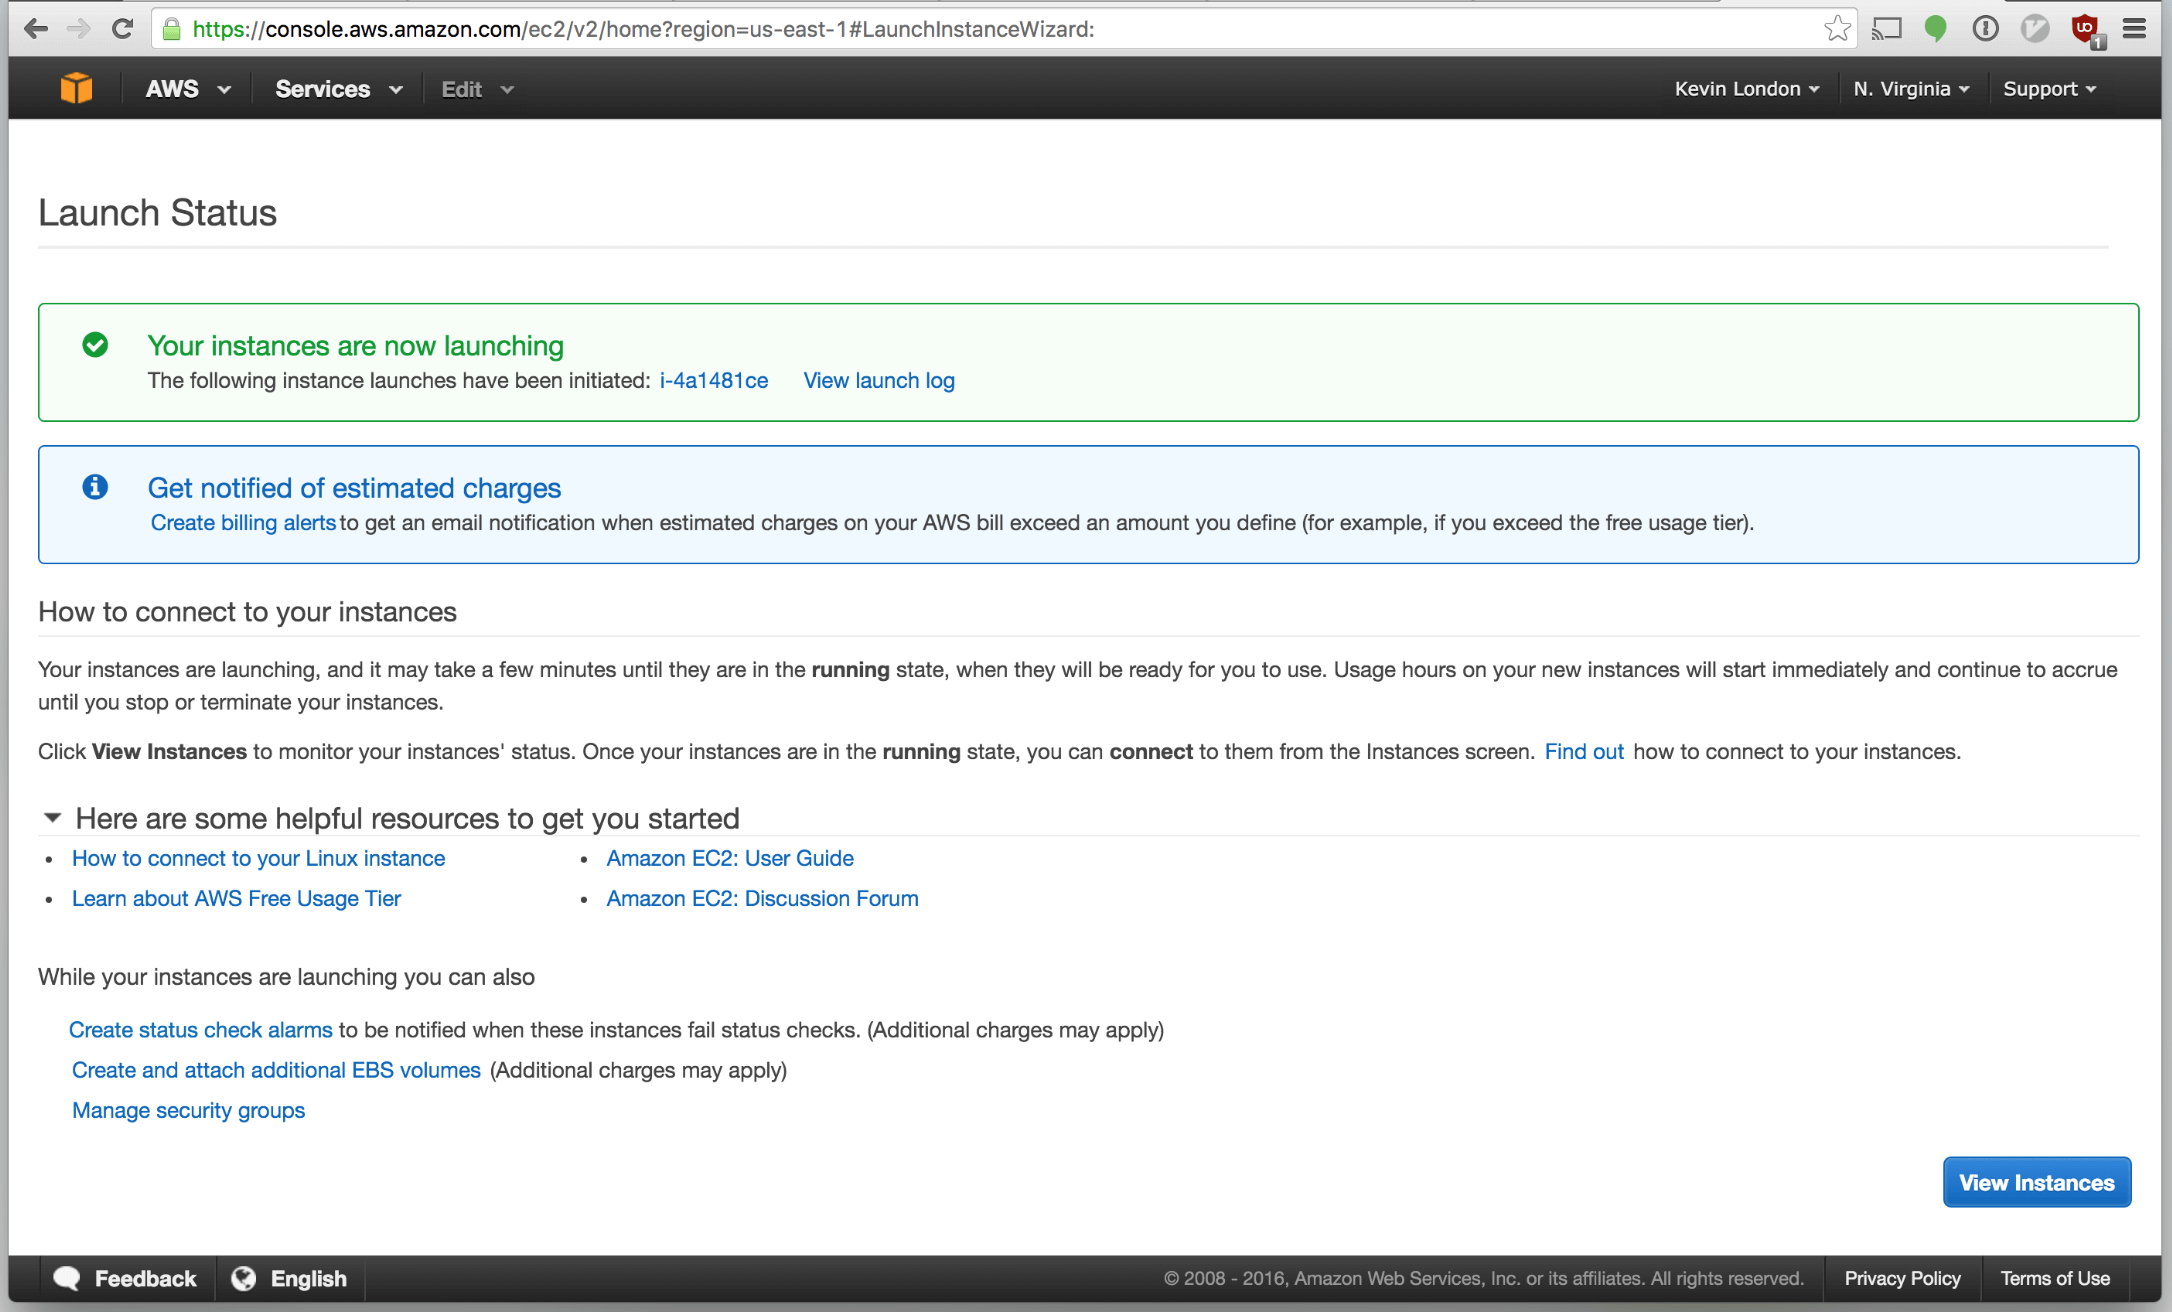
Click “View Instances”. You should return to the main Instances page and see your instance launching. Nice!
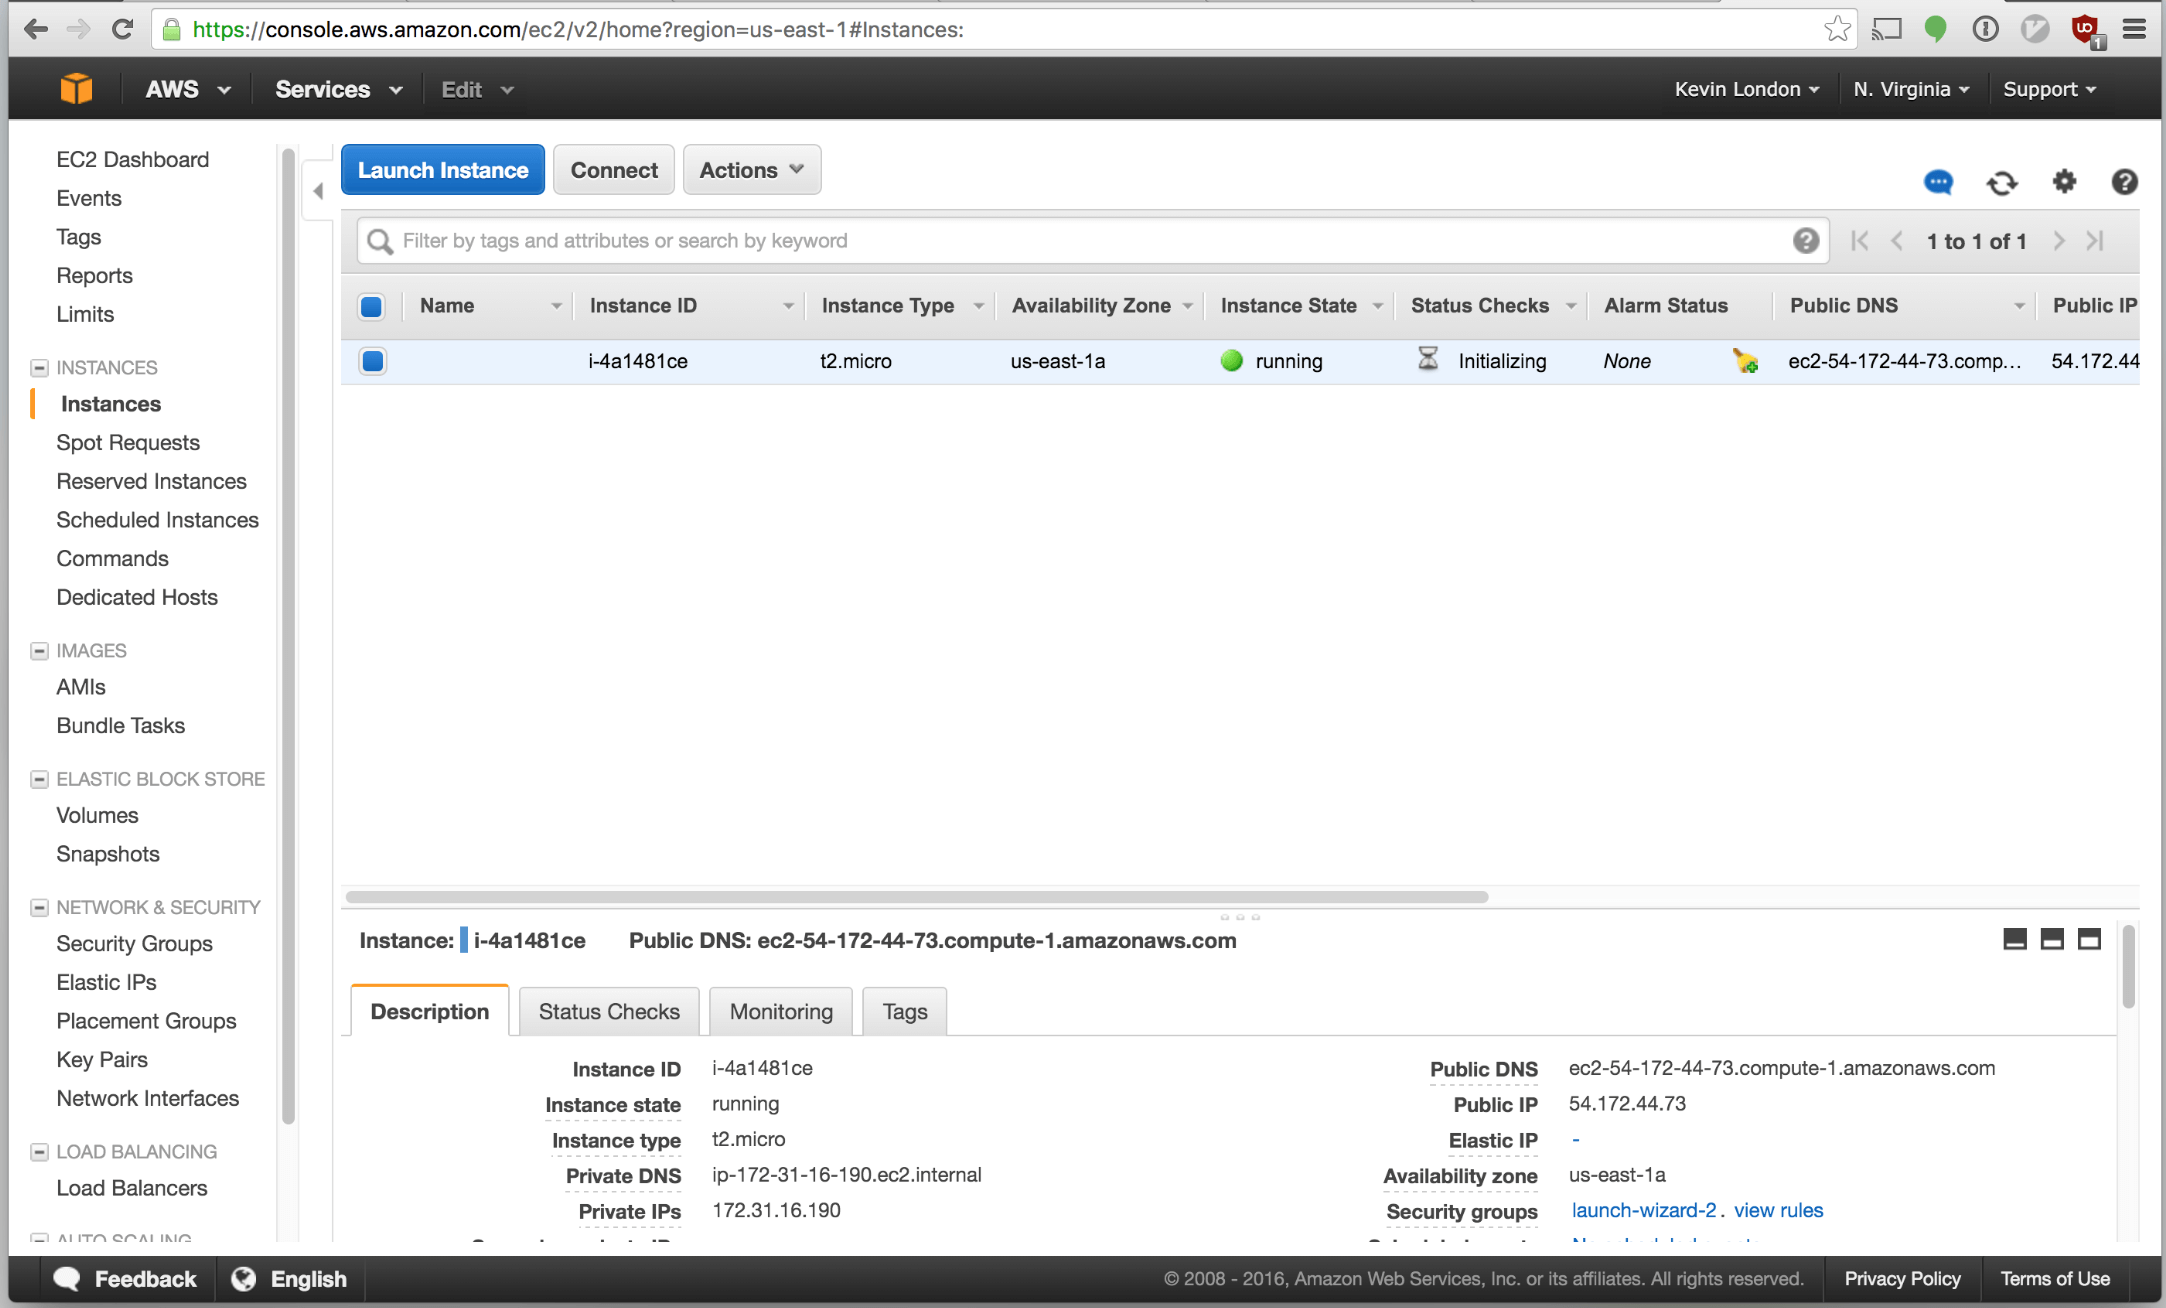
Let’s quickly ssh into your box using the private key that we generated just to make sure everything is working. You can get the public IP address on the instance page on the bottom right.
In your terminal:
Type ssh -i <your-key-path>/flask-hello-world.pem ubuntu@<your-server-ip> (without
the brackets, of course). This will try to use the private key we downloaded
from Amazon to log in as the ubuntu user that’s included in the image we used
to start the instance. We’ll see something like this:
$ ssh -i /Users/kevinlondon/Downloads/flask-hello-world.pem 54.172.44.73
The authenticity of host '54.172.44.73 (54.172.44.73)' can't be established.
ECDSA key fingerprint is SHA256:Br7lA5pReSmk+WVcr9xKwPKZrs5uLaUOg1eAngkZNxU.
Are you sure you want to continue connecting (yes/no)? yes
Warning: Permanently added '54.172.44.73' (ECDSA) to the list of known hosts.
@@@@@@@@@@@@@@@@@@@@@@@@@@@@@@@@@@@@@@@@@@@@@@@@@@@@@@@@@@@
@         WARNING: UNPROTECTED PRIVATE KEY FILE!          @
@@@@@@@@@@@@@@@@@@@@@@@@@@@@@@@@@@@@@@@@@@@@@@@@@@@@@@@@@@@
Permissions 0644 for '/Users/kevinlondon/Downloads/flask-hello-world.pem' are too open.
It is required that your private key files are NOT accessible by others.
This private key will be ignored.
Load key "/Users/kevinlondon/Downloads/flask-hello-world.pem": bad permissions
Permission denied (publickey).
Well… oops. Okay let’s change the permissions on it. Run
chmod 400 <your-key-path>/flask-hello-world.pem. That’ll change the file so that only our
user can read it. Retry your ssh connection after you’ve done it. Once you’re
sure you can log in, that will be the last time we SSH manually into our
instance.
Ansible x Amazon EC2 Setup
Now that we have a box up, let’s configure Ansible to provision it.
Let’s first make sure Ansible can ping your host and use SSH to log in to it. Before we can begin, we need to set up the inventory file so Ansible knows about our server.
Create a file called hosts in your Ansible directory. It’ll be quite short for
now!
[webservers]
<your-server-ip>
In this file, we’re describing a group of servers (webservers), with a single
host: the server IP we grabbed above. Once you’ve saved the file, you can run
the following command:
Run ansible -m ping webservers --private-key=<your-key-path>/flask-hello-world.pem --inventory=hosts --user=ubuntu. Here’s what I saw:
$ ansible -m ping webservers --private_key=~/Downloads/flask-hello-world.pem
--inventory=hosts --user=ubuntu

54.172.44.73 | SUCCESS => {
    "changed": false,
    "ping": "pong"
}
It’s similar to what we did for sshing into the box, and with good
reason. Ansible is entirely built upon SSH. That said, this is dumb right?
I don’t want to type all these command line arguments.
Great, let’s make ourselves an Ansible config
file to automate most
of that. Create a file named ansible.cfg in your directory that contains the
following:
[defaults]
inventory = hosts
remote_user = ubuntu
private_key_file = <your-key-path>/flask-hello-world.pem
Now, we should be able to run ansible ping -m all or ansible ping -m webservers without specifying the private key or user. Give it a try!
Deploying to AWS with Ansible
With all that footwork out of the way, deploying is actually very simple.
Run ansible-playbook -v site.yml. It’ll start deploying to your instance.
Wait, what? Yep! The same file that set up your Vagrant file can be used to
configure this one. Since the webservers is considered to be in the all
group, it gets broomed up. After a minute or so, your server should be in the
same state as your Vagrant virtual machine.
At the end, we should see something like this:
PLAY RECAP *********************************************************************
54.172.44.73               : ok=9    changed=8    unreachable=0    failed=0
Then let’s go to your server at http://<your-server-ip> annndddd…
Hm.
It’s not loading. Oh, right, remember those warnings that Amazon gave us about the security groups when we launched the instance? Now we have to take care of that.
AWS Security Groups for your Instance
Click “Security Groups”.
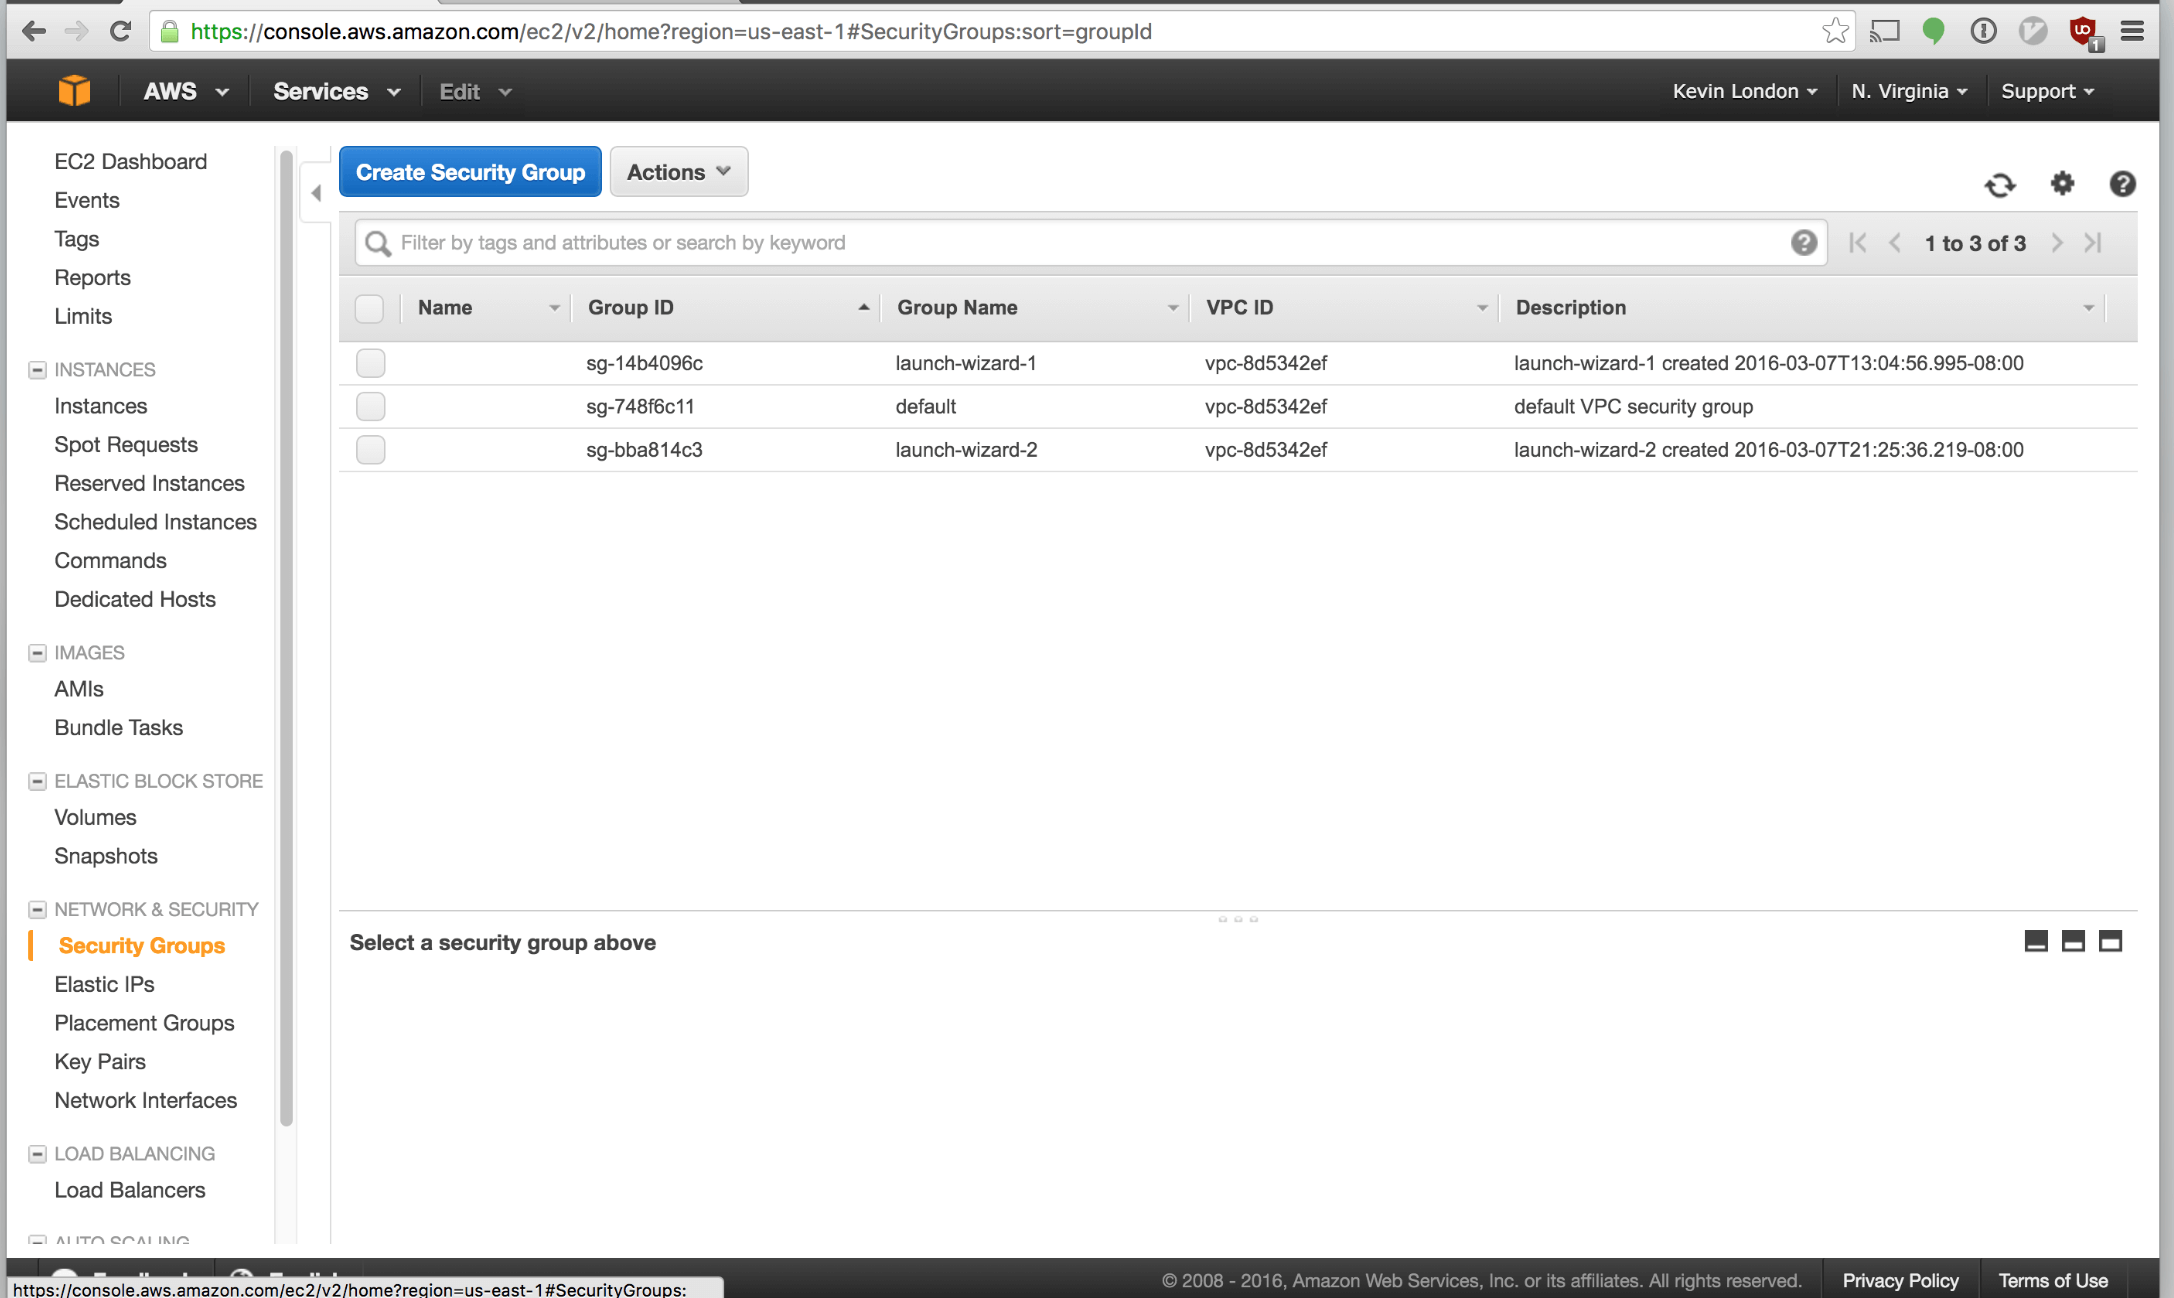
Click “Create Security Group” button along the top.
 Add a new security group named
 web. Click “Add Rule”. For the first, select
HTTP. For the second, select HTTPS. That will allow web traffic to travel
through to your instance.
Click “Create”.
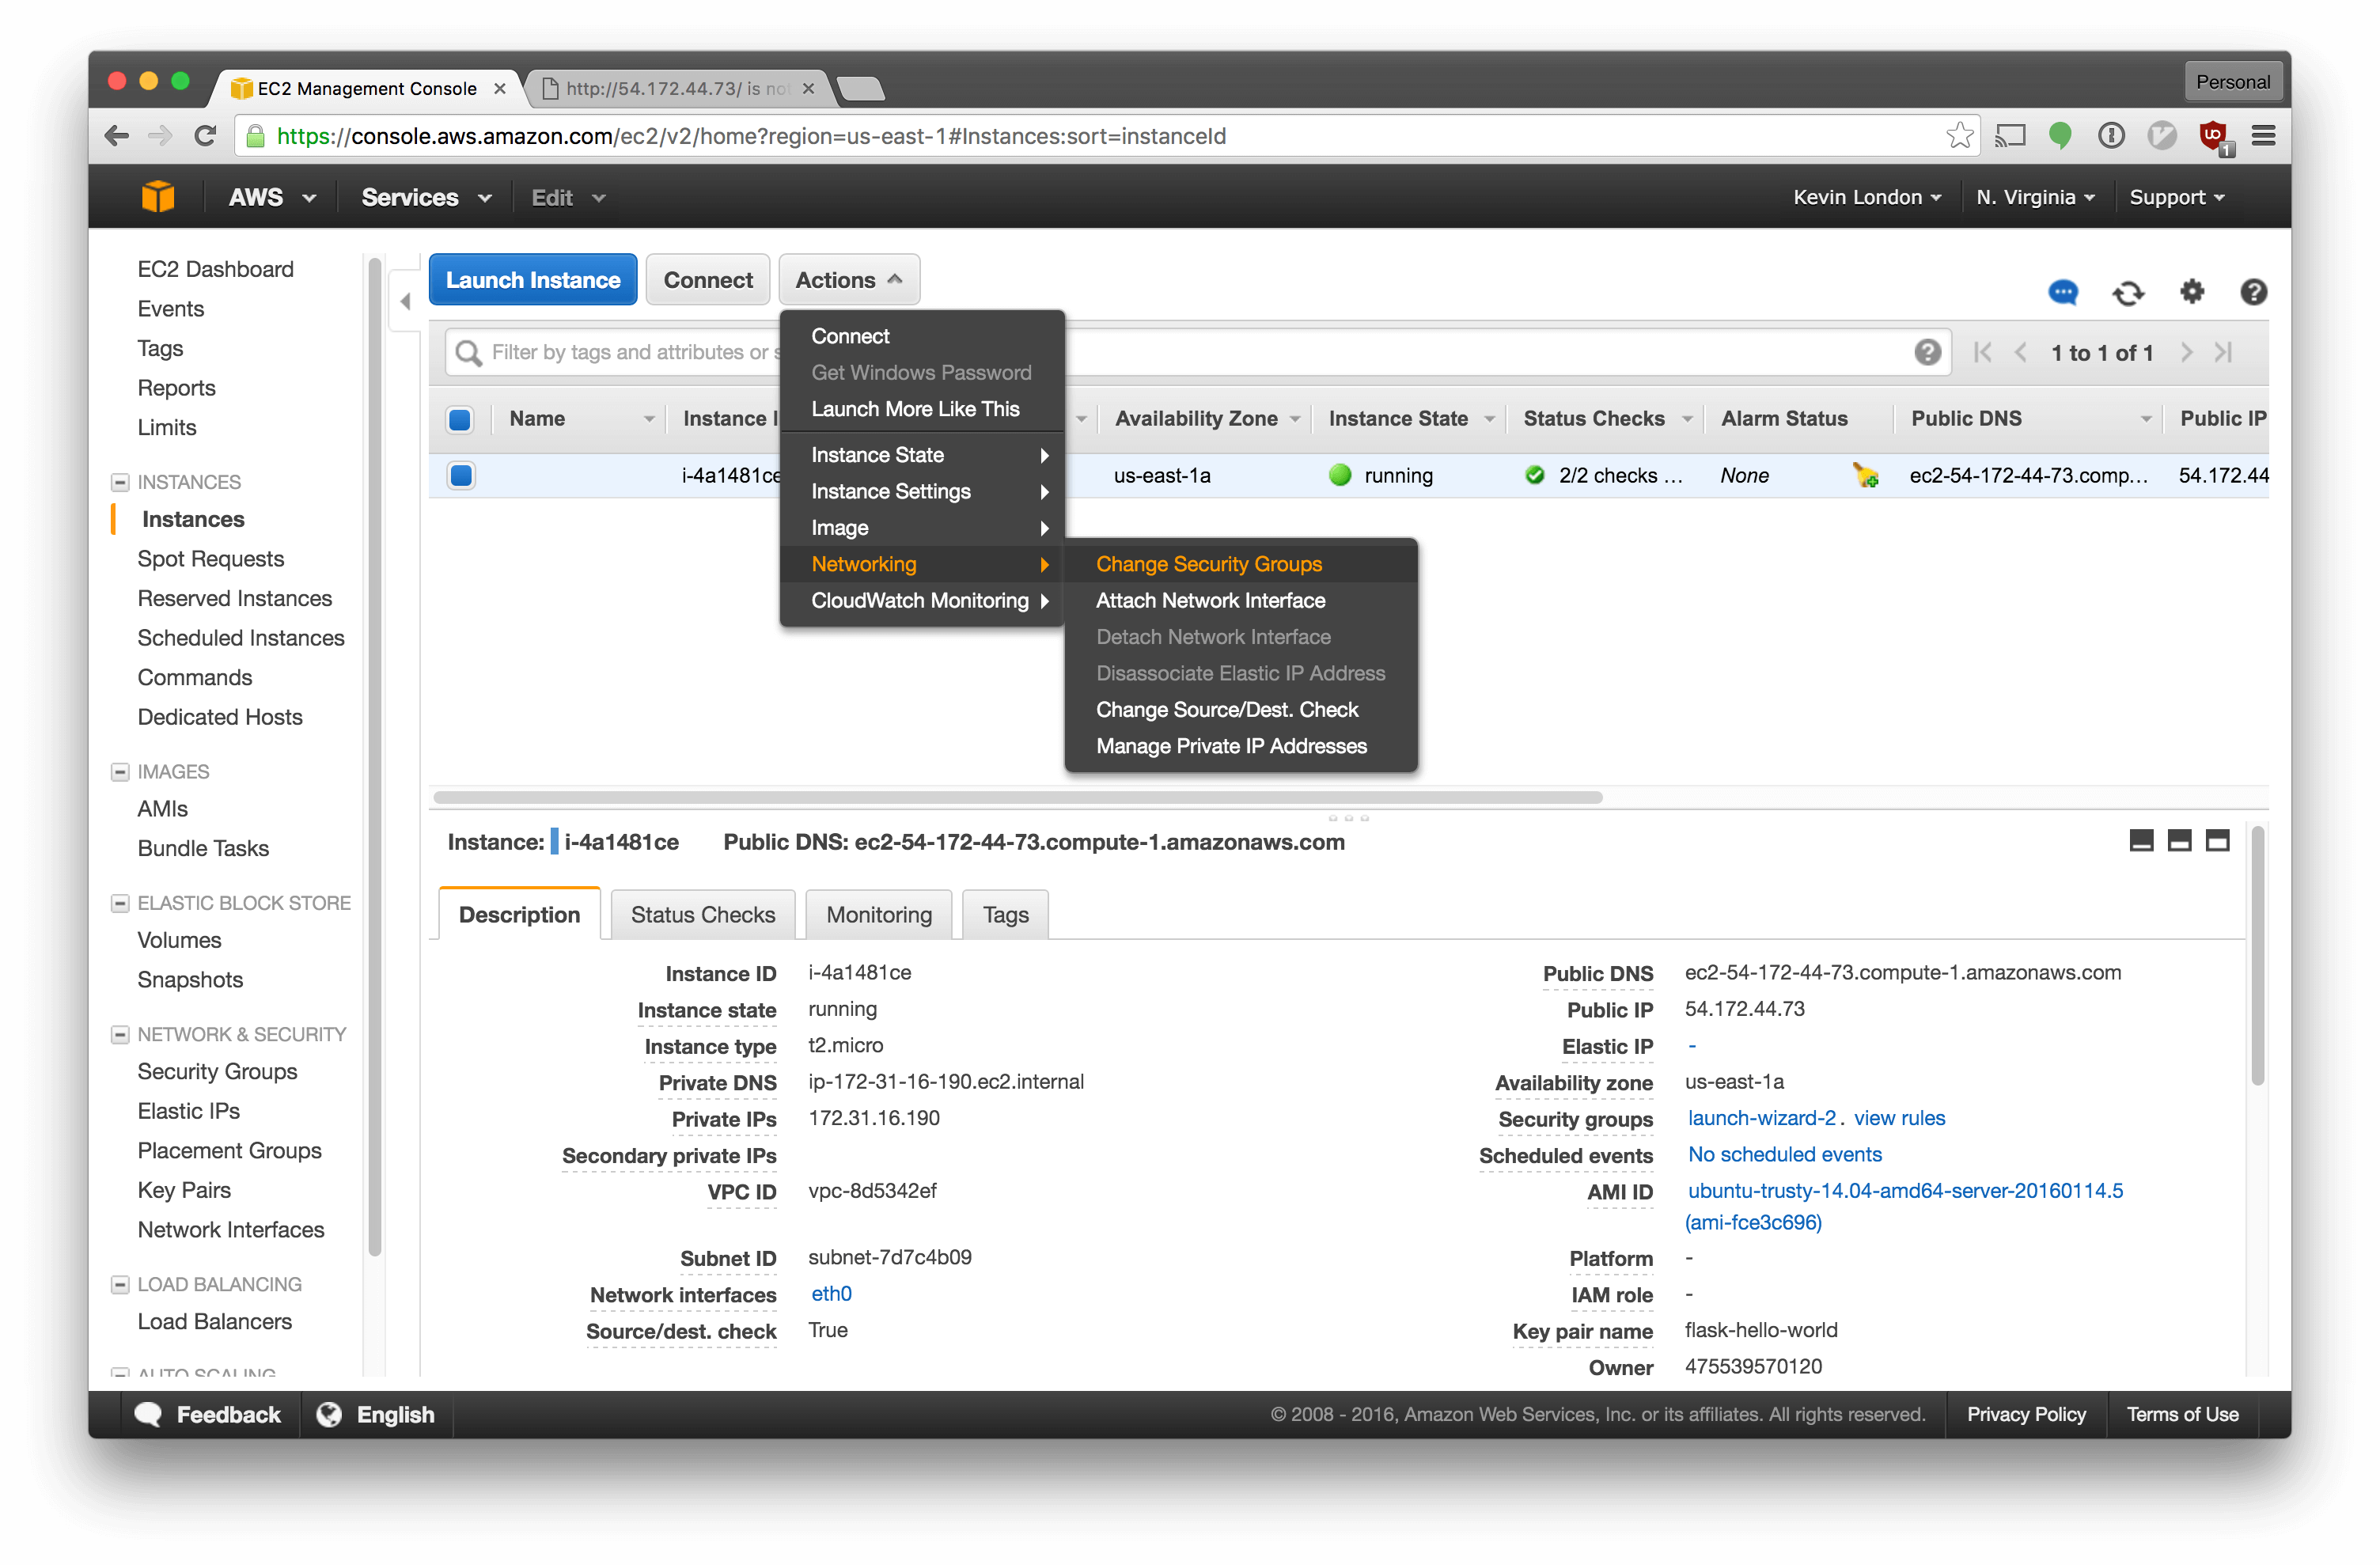
Now we have to associate it with our instance. Click the “Actions” dropdown and select “Networking” - “Change Security Groups”.
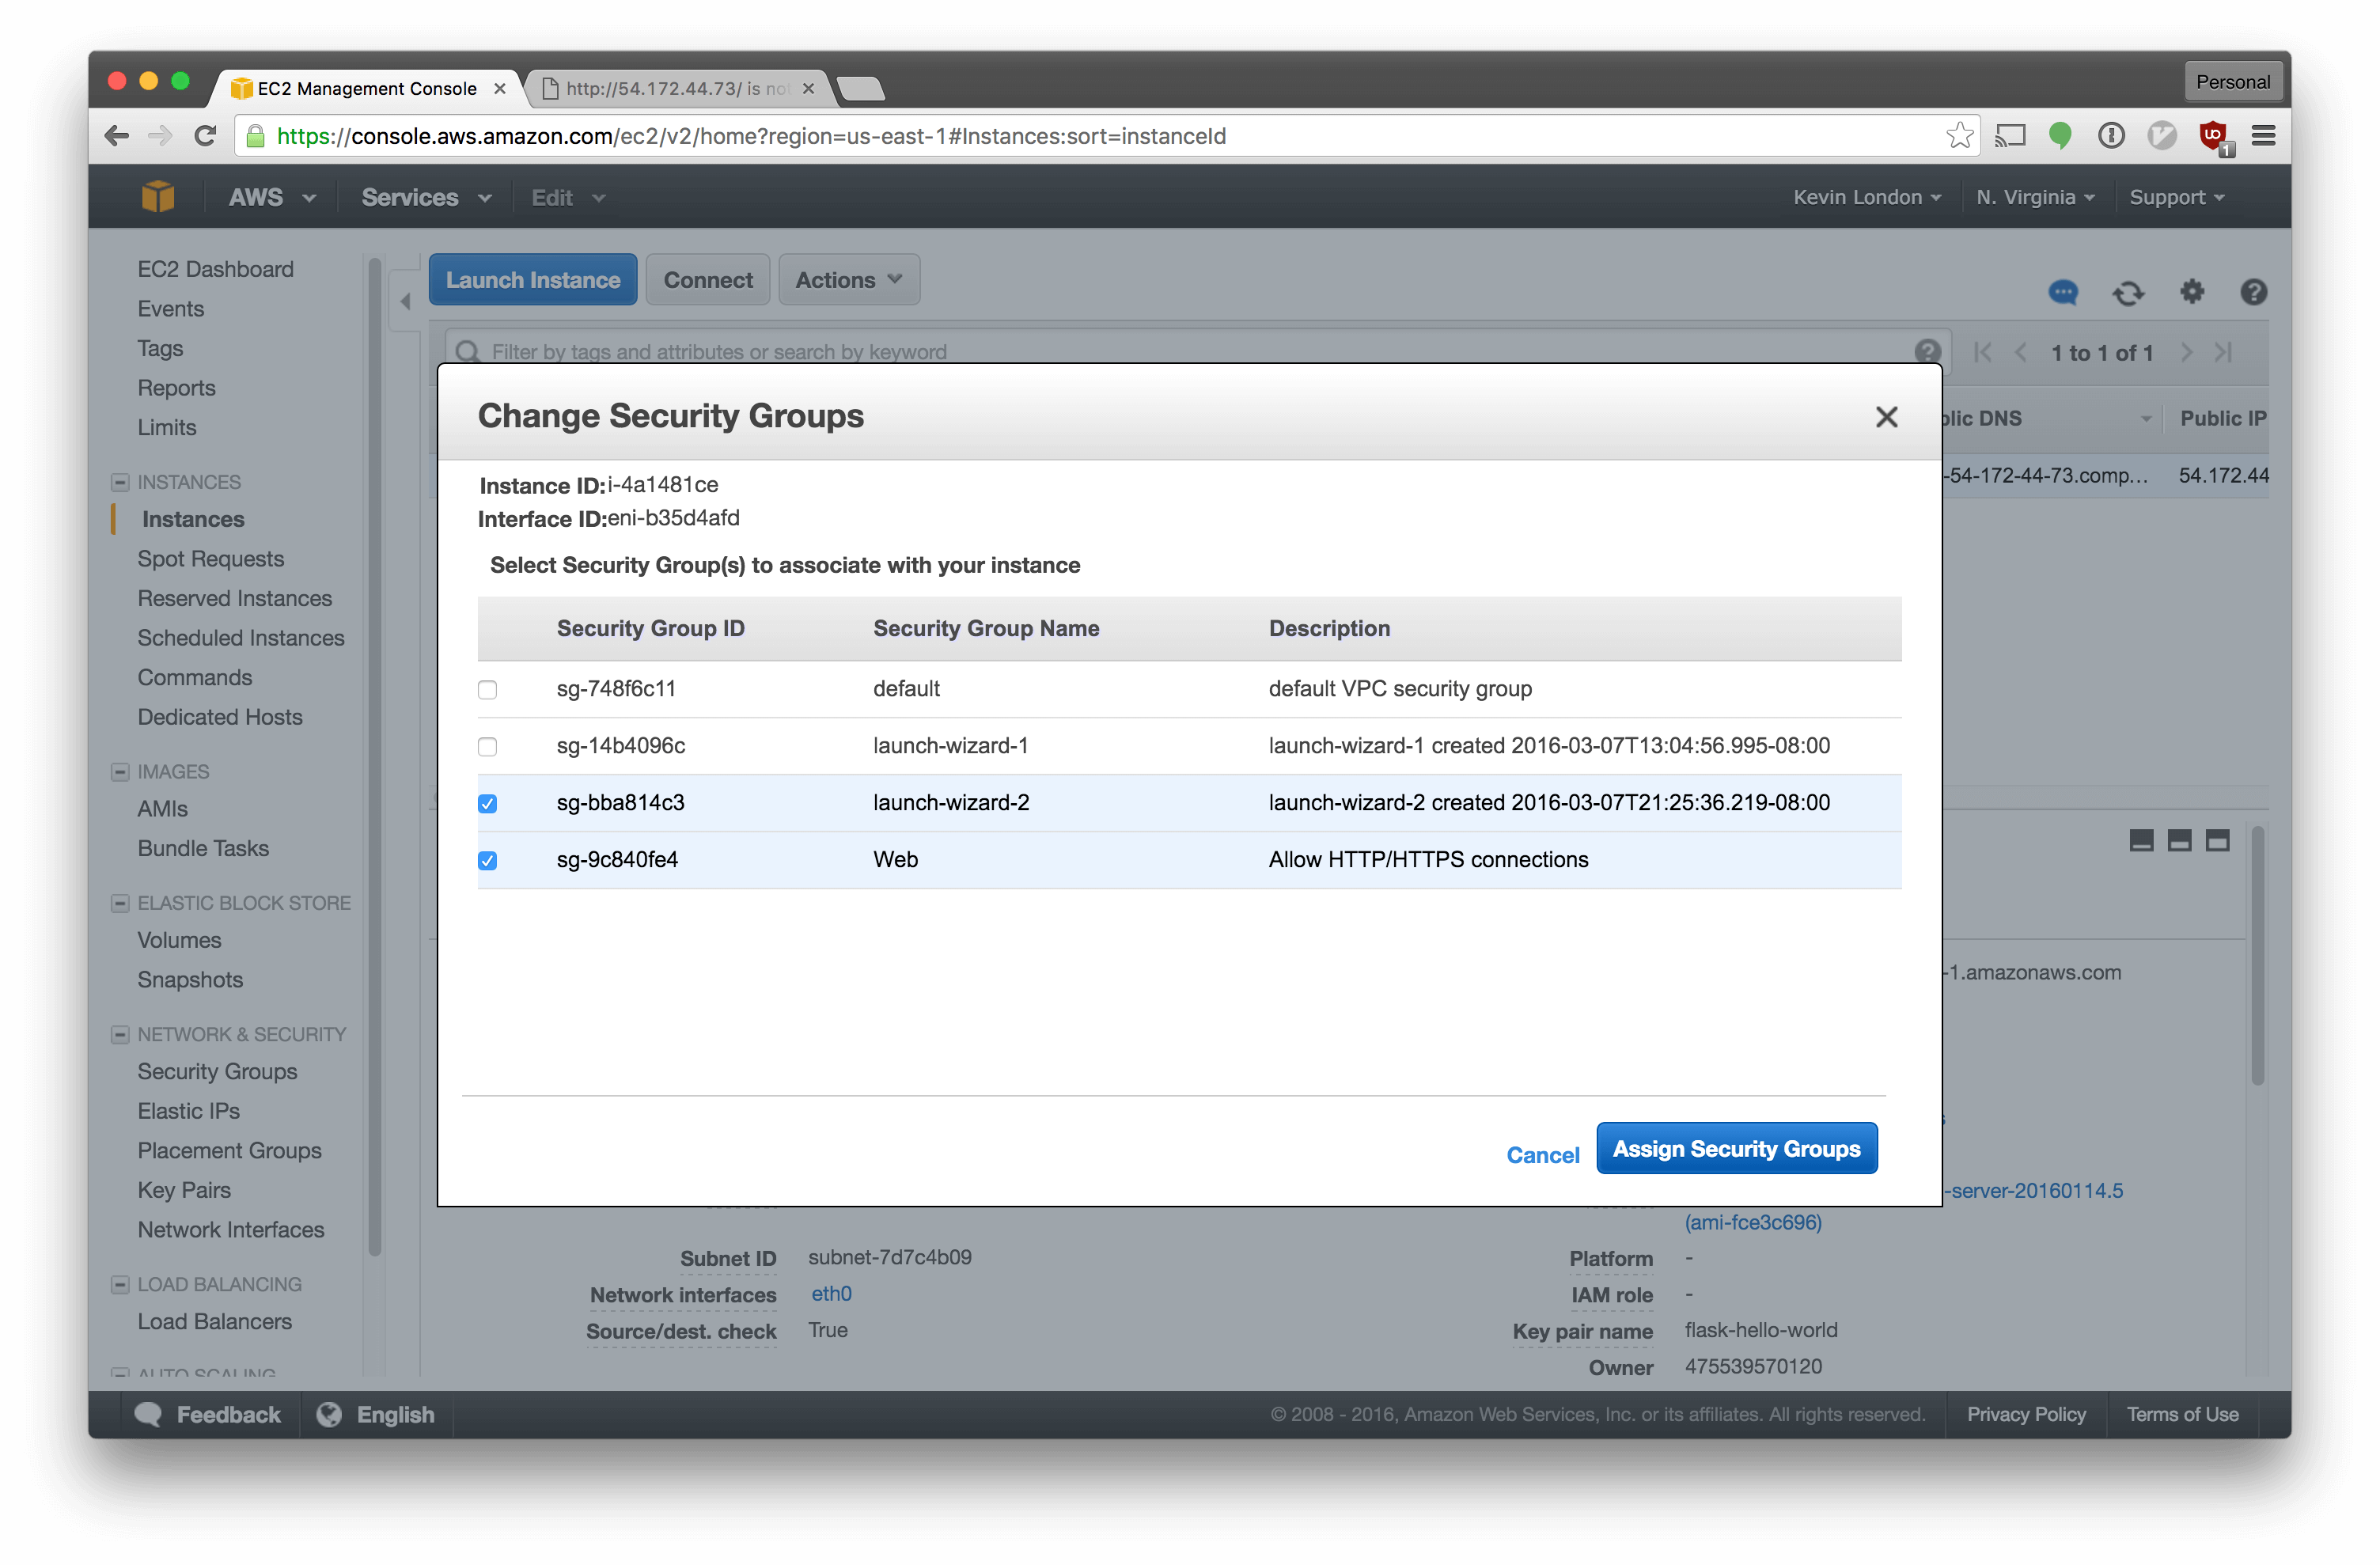 Select the new group in addition to the previous one.
After you’ve associated the group, you should actually be able to visit your
instance. Go to http://<your-server-ip>.
Hooray! We have a server!
Notice all those screenshots we need to accomplish this. Too much, right? Let’s automate that too. Automate all the things.
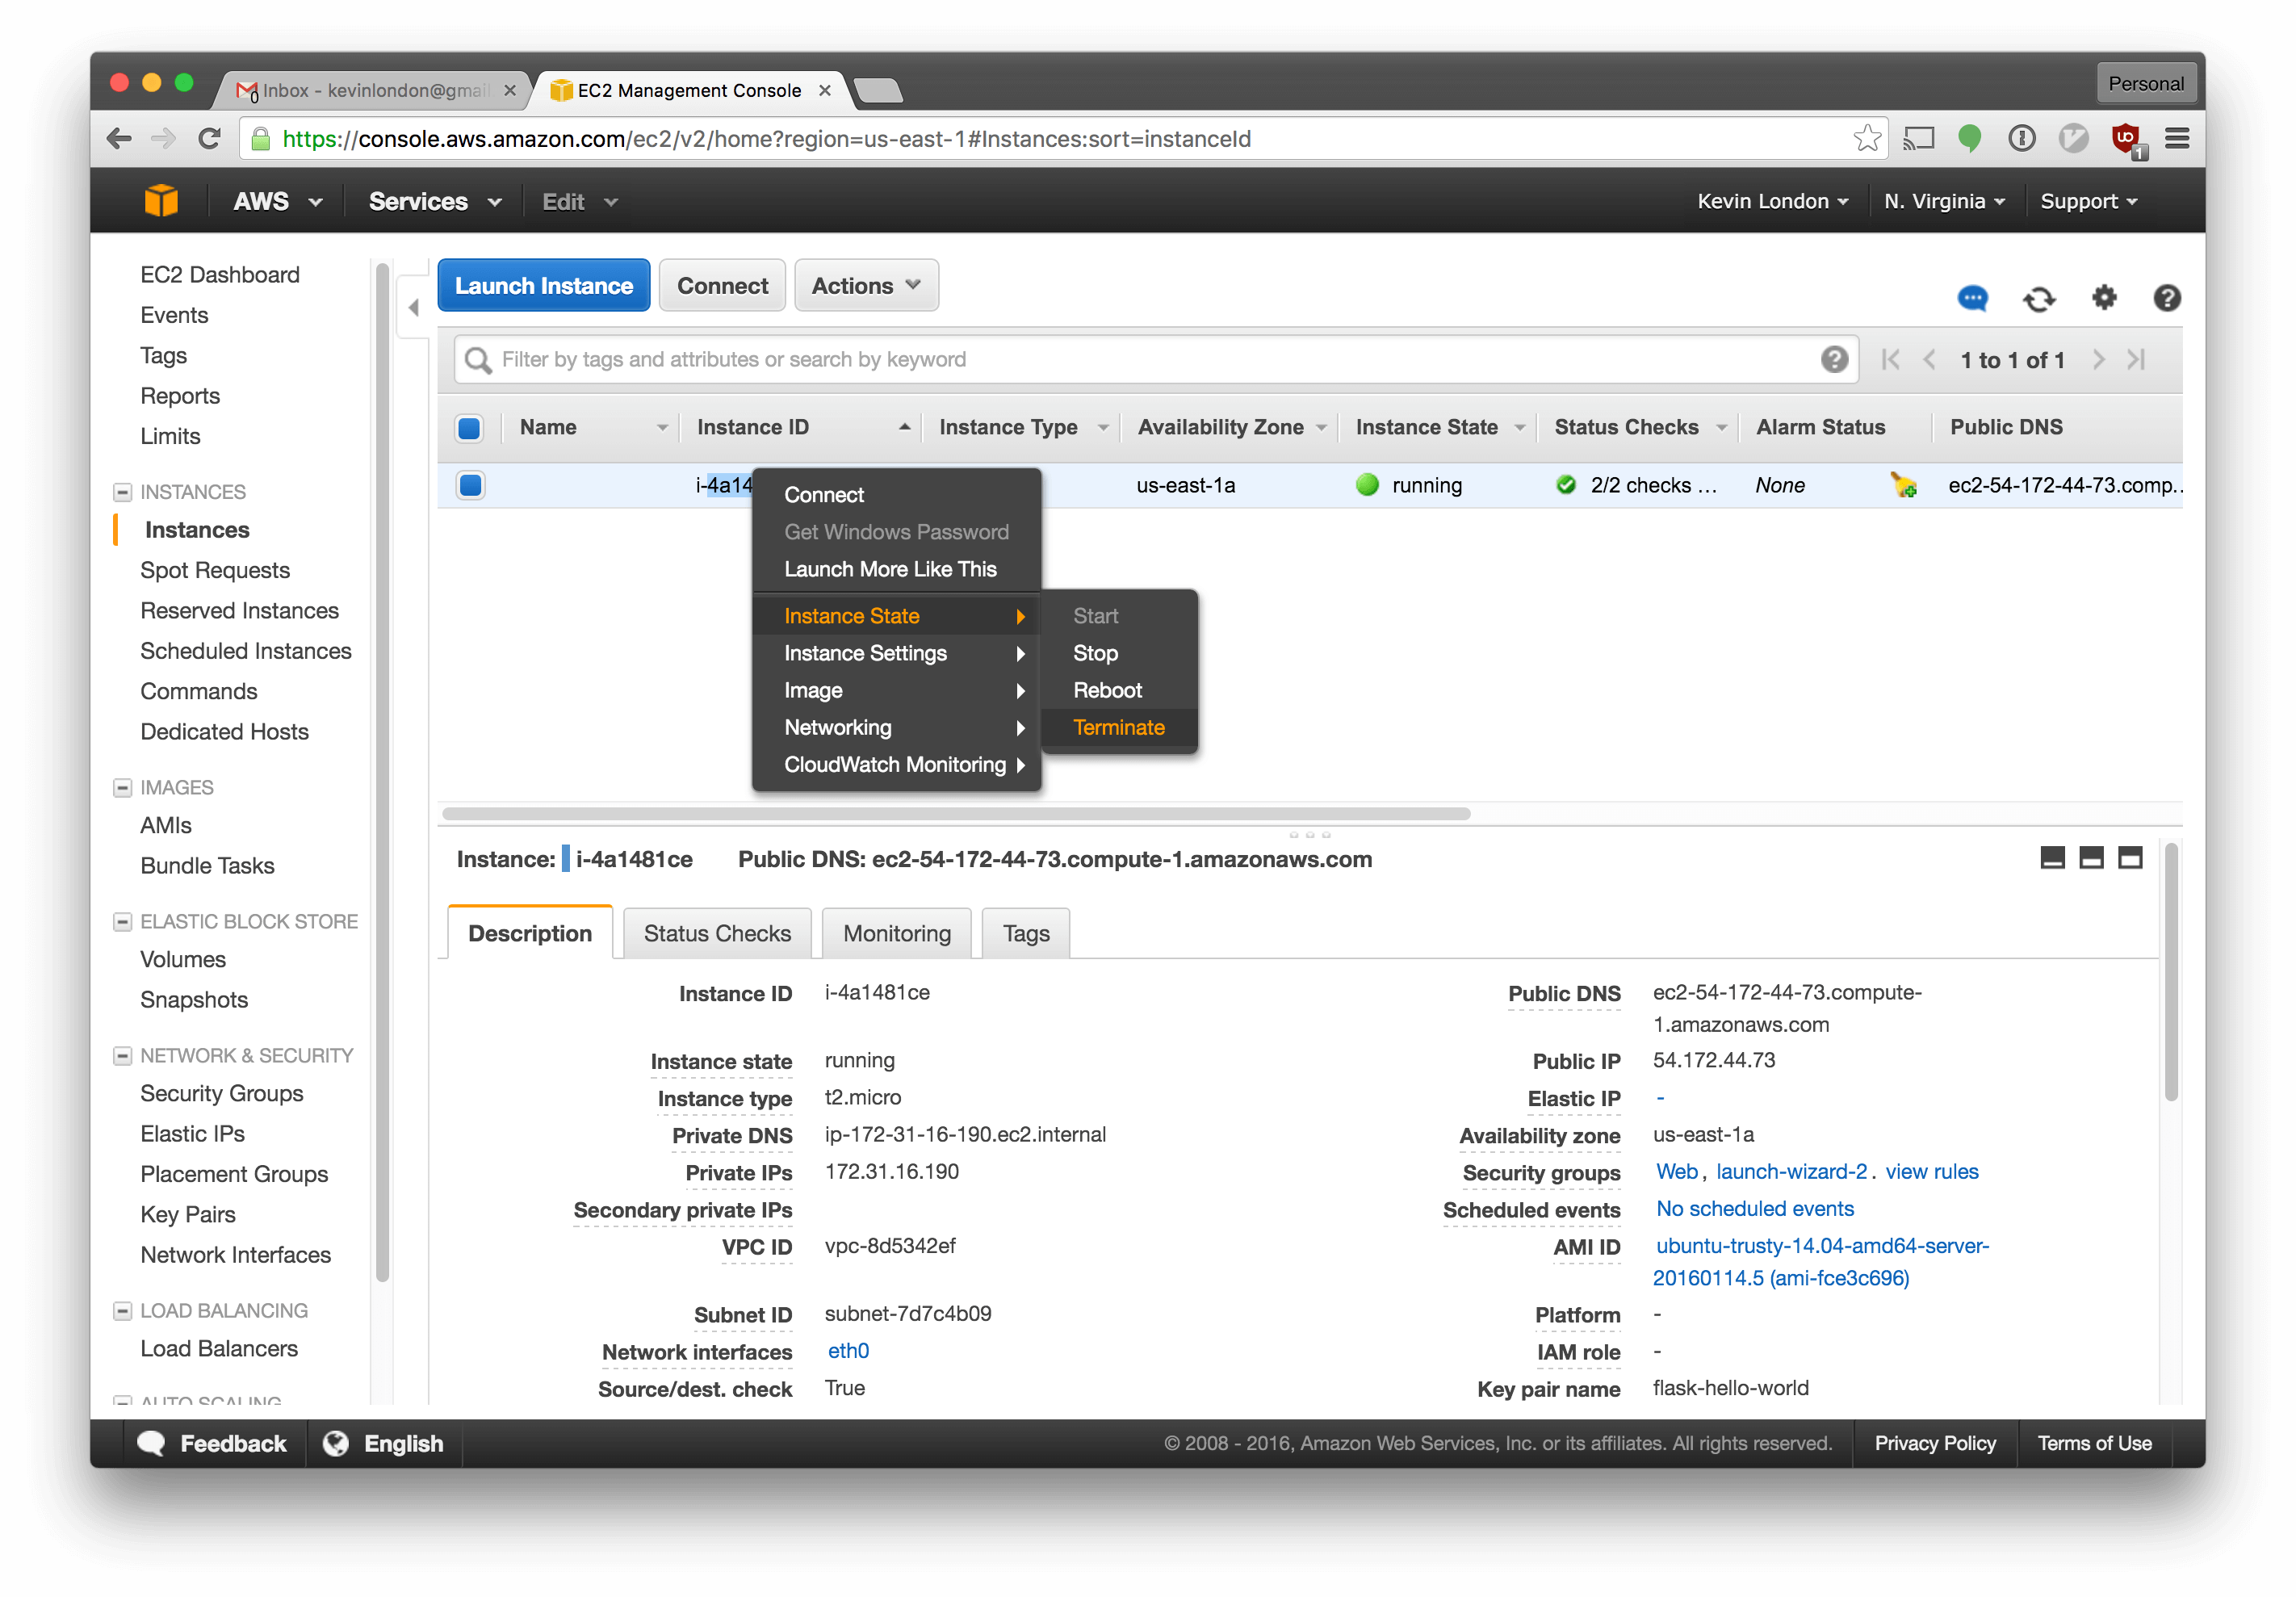
We won’t need the original instance anymore, we can destroy it. Select EC2 instances again, right click your instance, and select Instance State -> Terminate.
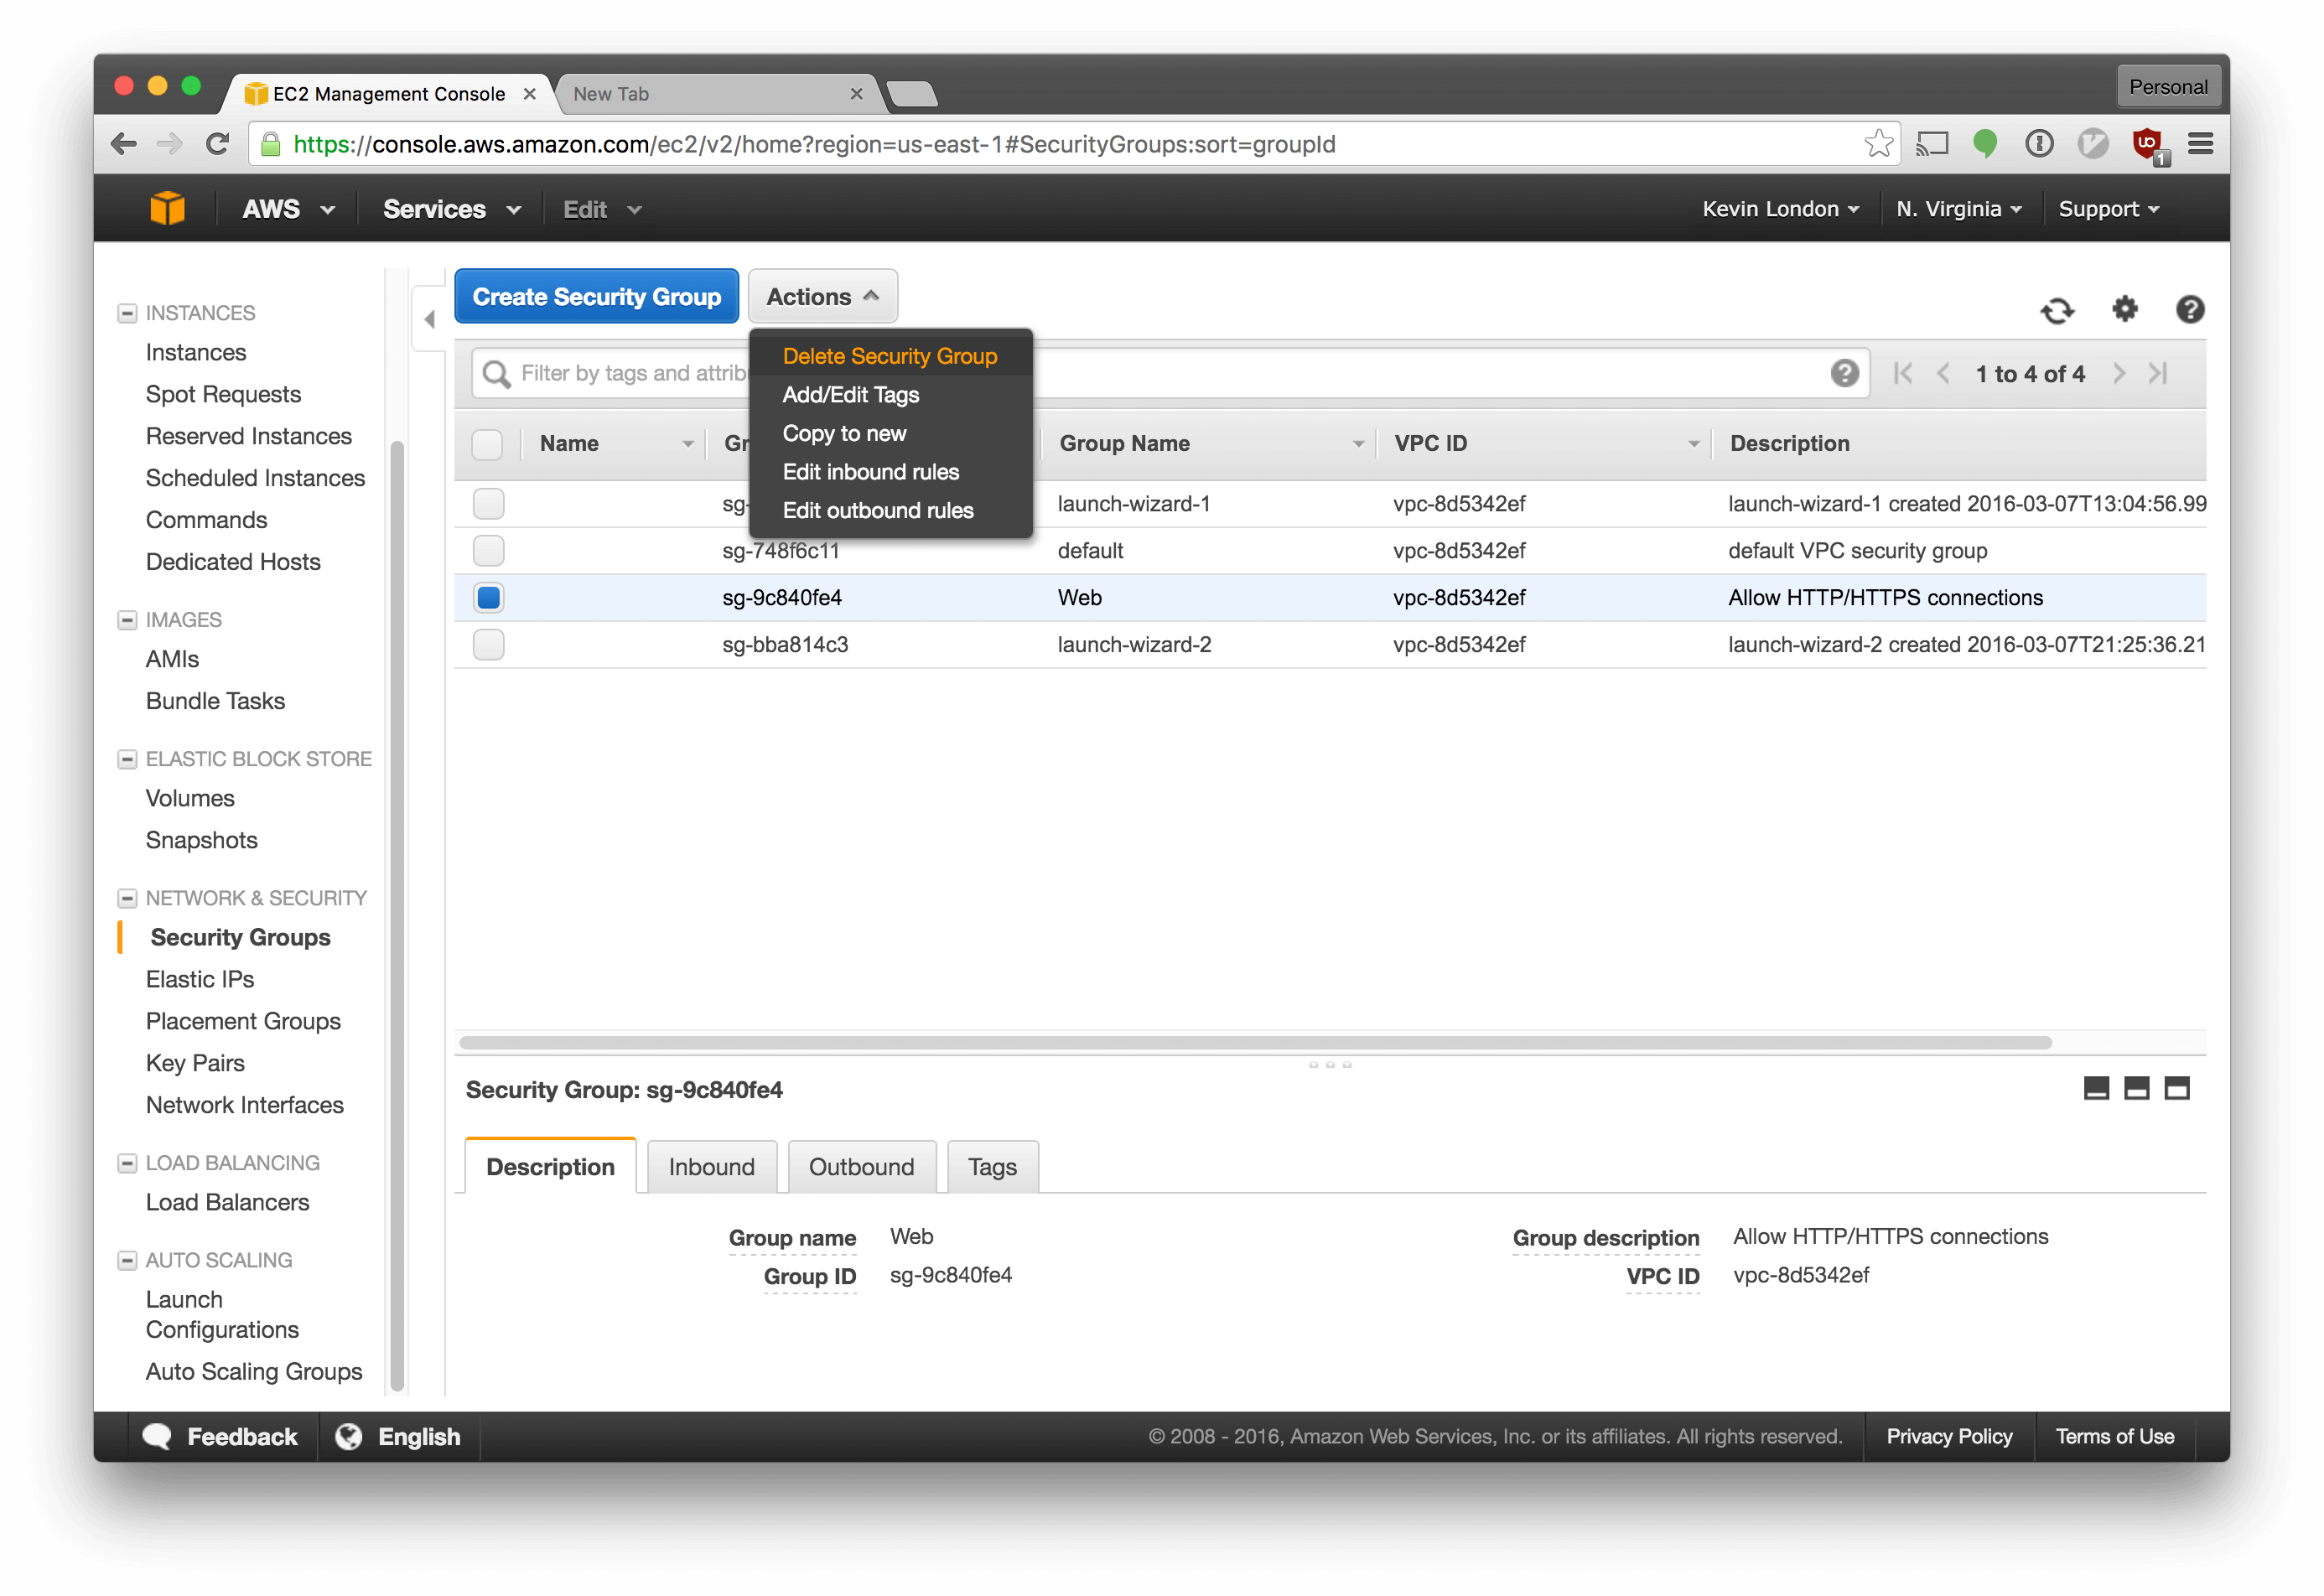
We should also destroy the security group we created for it. Go into Security Groups, select Web, then select Actions -> Delete Security Group.
Ok, all set! No more clicking around in the AWS console for us.
Automating AWS Instance with Terraform
Time for add another tool to our toolkit! We’ll use Terraform to provision our infrastructure. Again, there are many options here - including CloudFormation and others.
Download and install Terraform from their Downloads page. If you use Mac OSX,
you can do a brew install terraform if you have homebrew
installed.
Basically how Terraform works is that we’ll define the different resources that we want to set up and then we’ll use Terraform to plan out what our changes will do and, finally, apply the plan.
In the same directory as we’ve been working, let’s make a new folder for
Terraform with mkdir terraform.
Then, cd into that directory and make a single new file called main.tf.
*.tf extensions indicate that they’re using the Terraform syntax, which is
similar to JSON.
In that file, add the following:
In the first provider block, we specify our credentials for AWS. The
${var.aws_secret_key} value, for example, tells Terraform to look for
a variable named aws_secret_key and plug the value in there. We’ll define the
variables in another file shortly.
For our instance, we set the Amazon AMI ID to match the one we
selected through the GUI. An Amazon AMI is a machine image, more or less.
We also set up its key and security groups to reference other resources.
"${aws_security_group.web.id}" tells Terraform to look for another
aws_security_group resource named web and plug in its id.
Next, we set up the security group as we did in the GUI. We’re letting in SSH control (port 22), HTTP (port 80), and nothing else. We’re allowing all outbound traffic.
Finally, we create a new aws_key_pair to remotely ssh into our server, just as
we did when setting it up manually.
Now, we had defined a few
variables in
our main.tf file, and we need to provide the values for those to Terraform.
Let’s make a new file called variables.tf. It should look like this:
One of the variables we’ve defined, public_key_path, expects the public part
of an SSH key to be available at ~/.ssh/id_rsa.pub. If you don’t already have
a private key, I’d recommend following Github’s guide and make one in that above path.
Finally, we’ll need one more file, which we’ll want to be sure we don’t include
in version control. This file will be terraform.tfvars, which,
by convention, contains secret keys and such.
Where do we get an aws_access_key and aws_secret_key? We can grab them from
the Amazon web console. We should make a new
user in Amazon’s console for Terraform. This way, if something goes
wrong with it or the key is exposed, we can replace the key for just this user.
Go back to the Amazon AWS Console. Select the “Identity & Access Management” section from the main AWS console screen. In the left navigation bar, select “Users”.
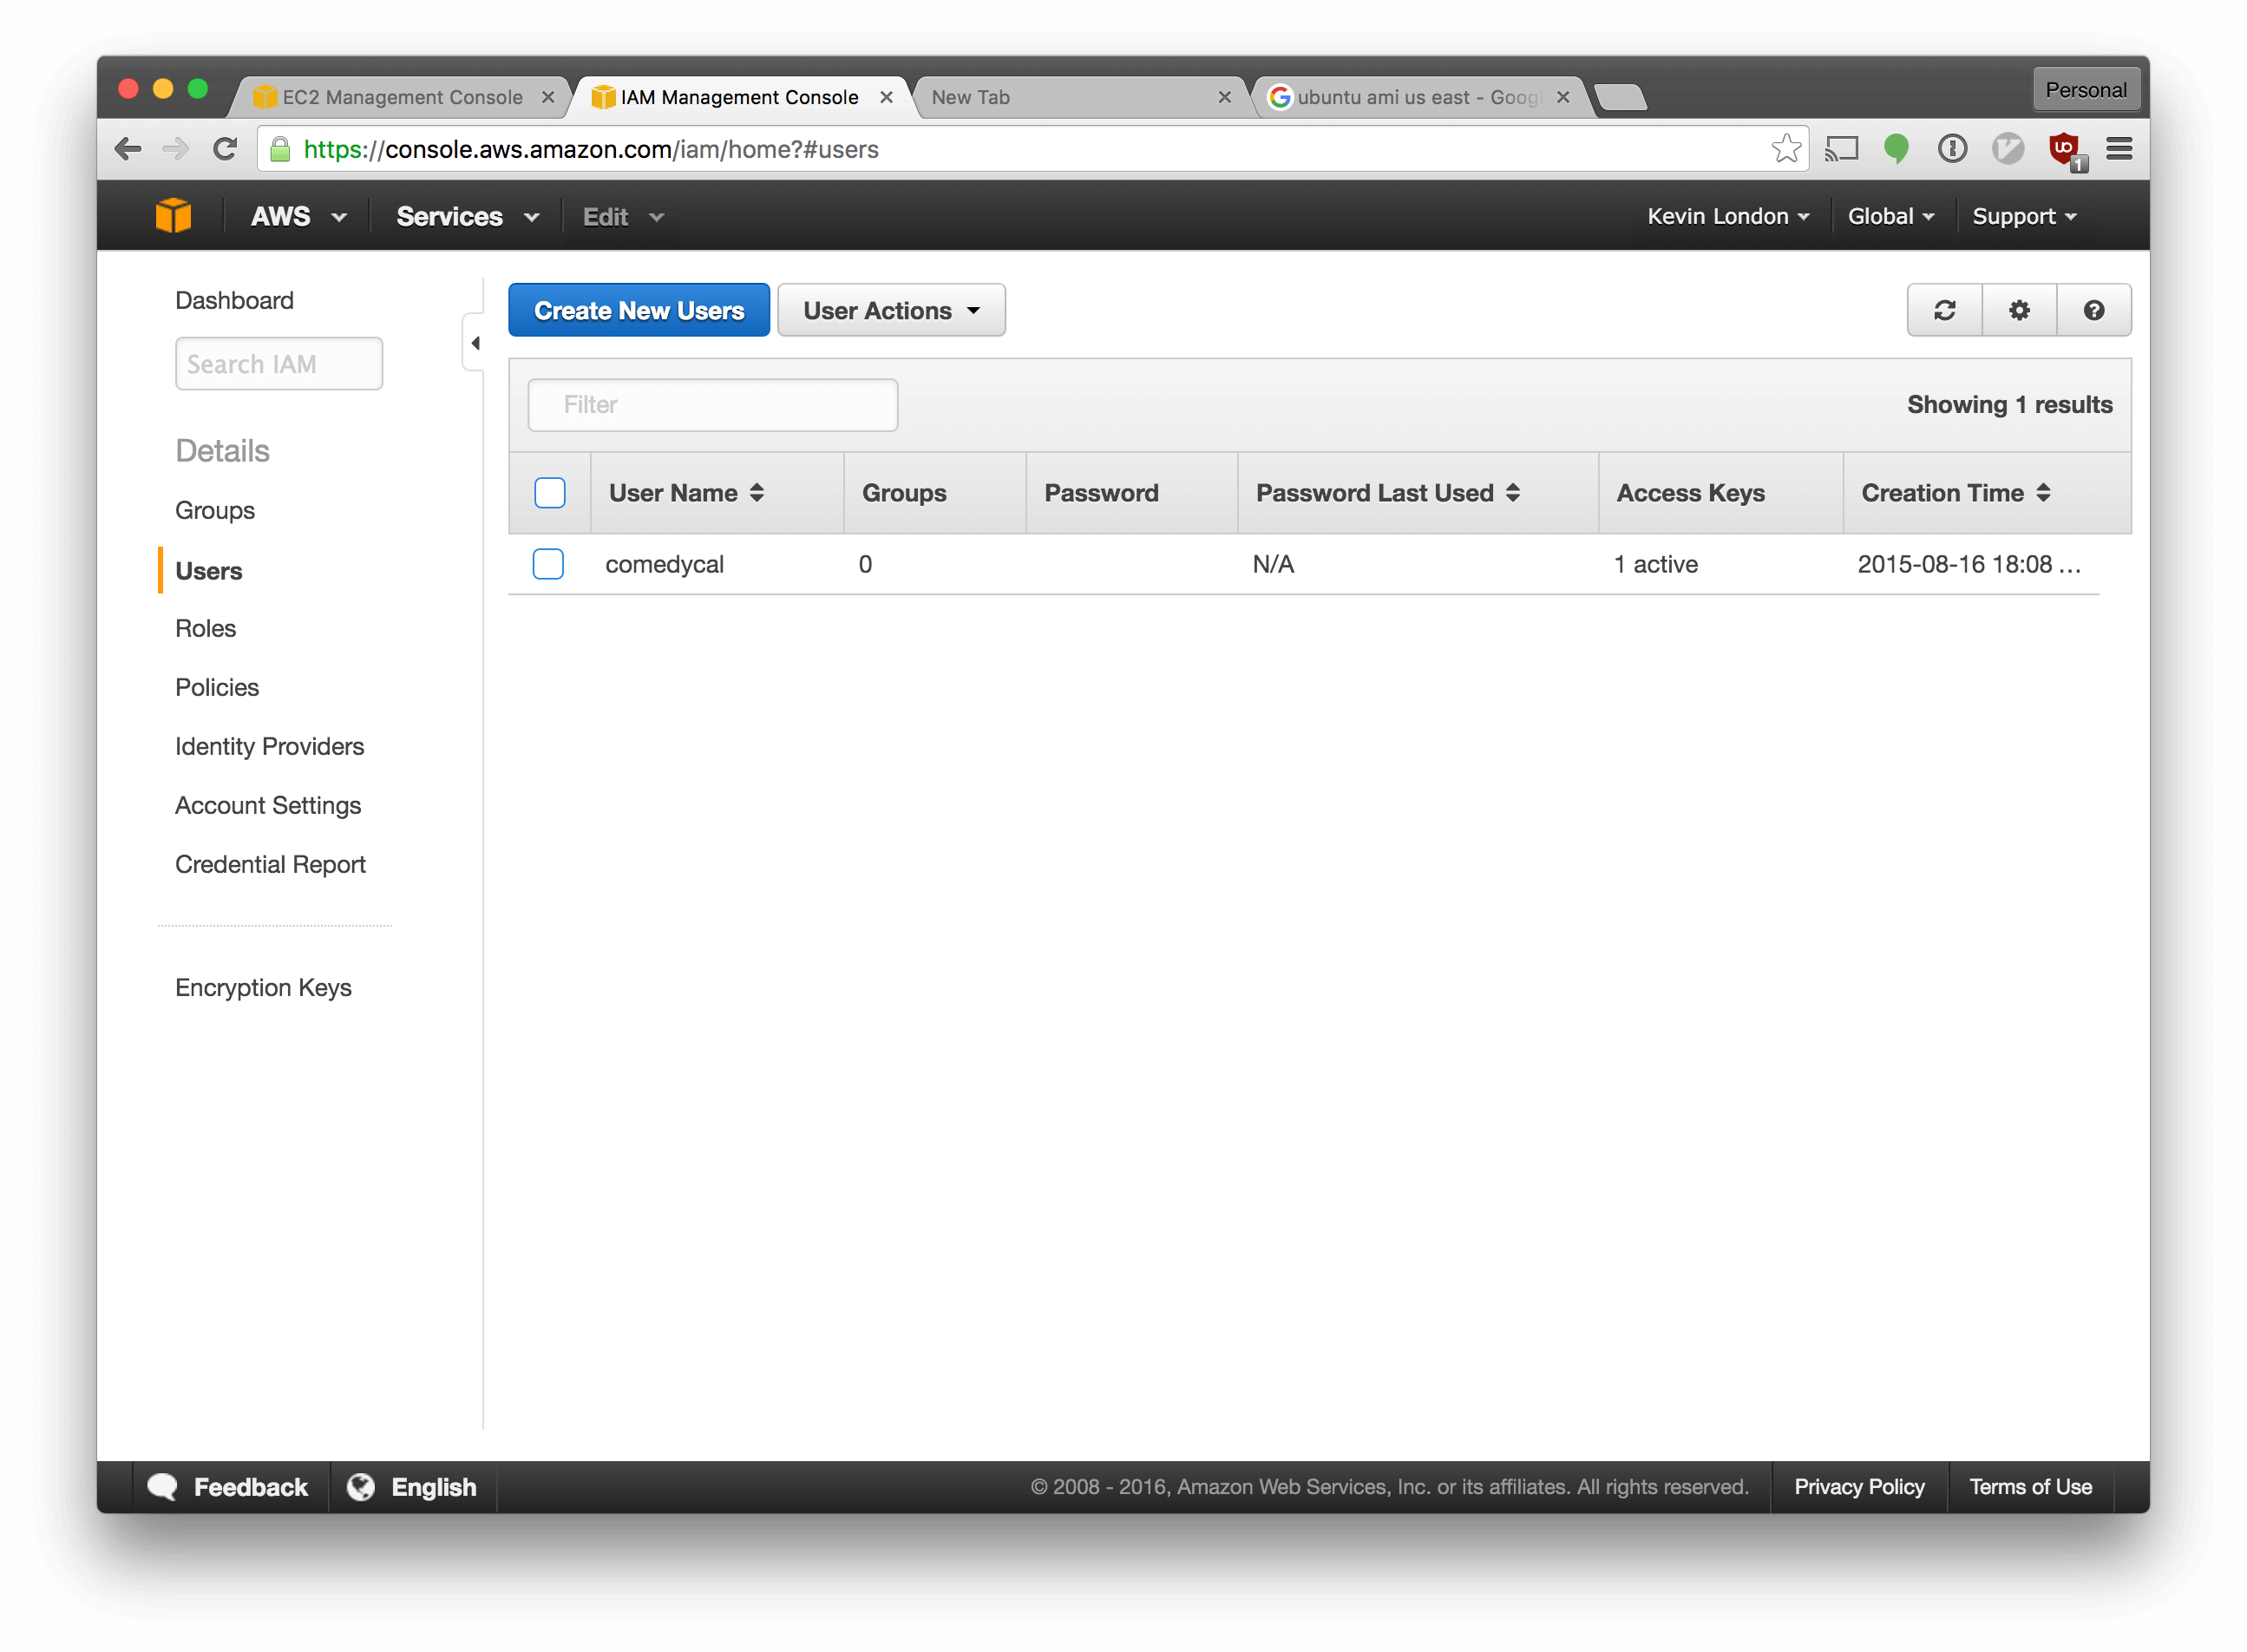
Make a new account in Amazon for your Terraform user by clicking the “Create New Users” button and following the prompts.
We also need to setup our permissions for the new user.
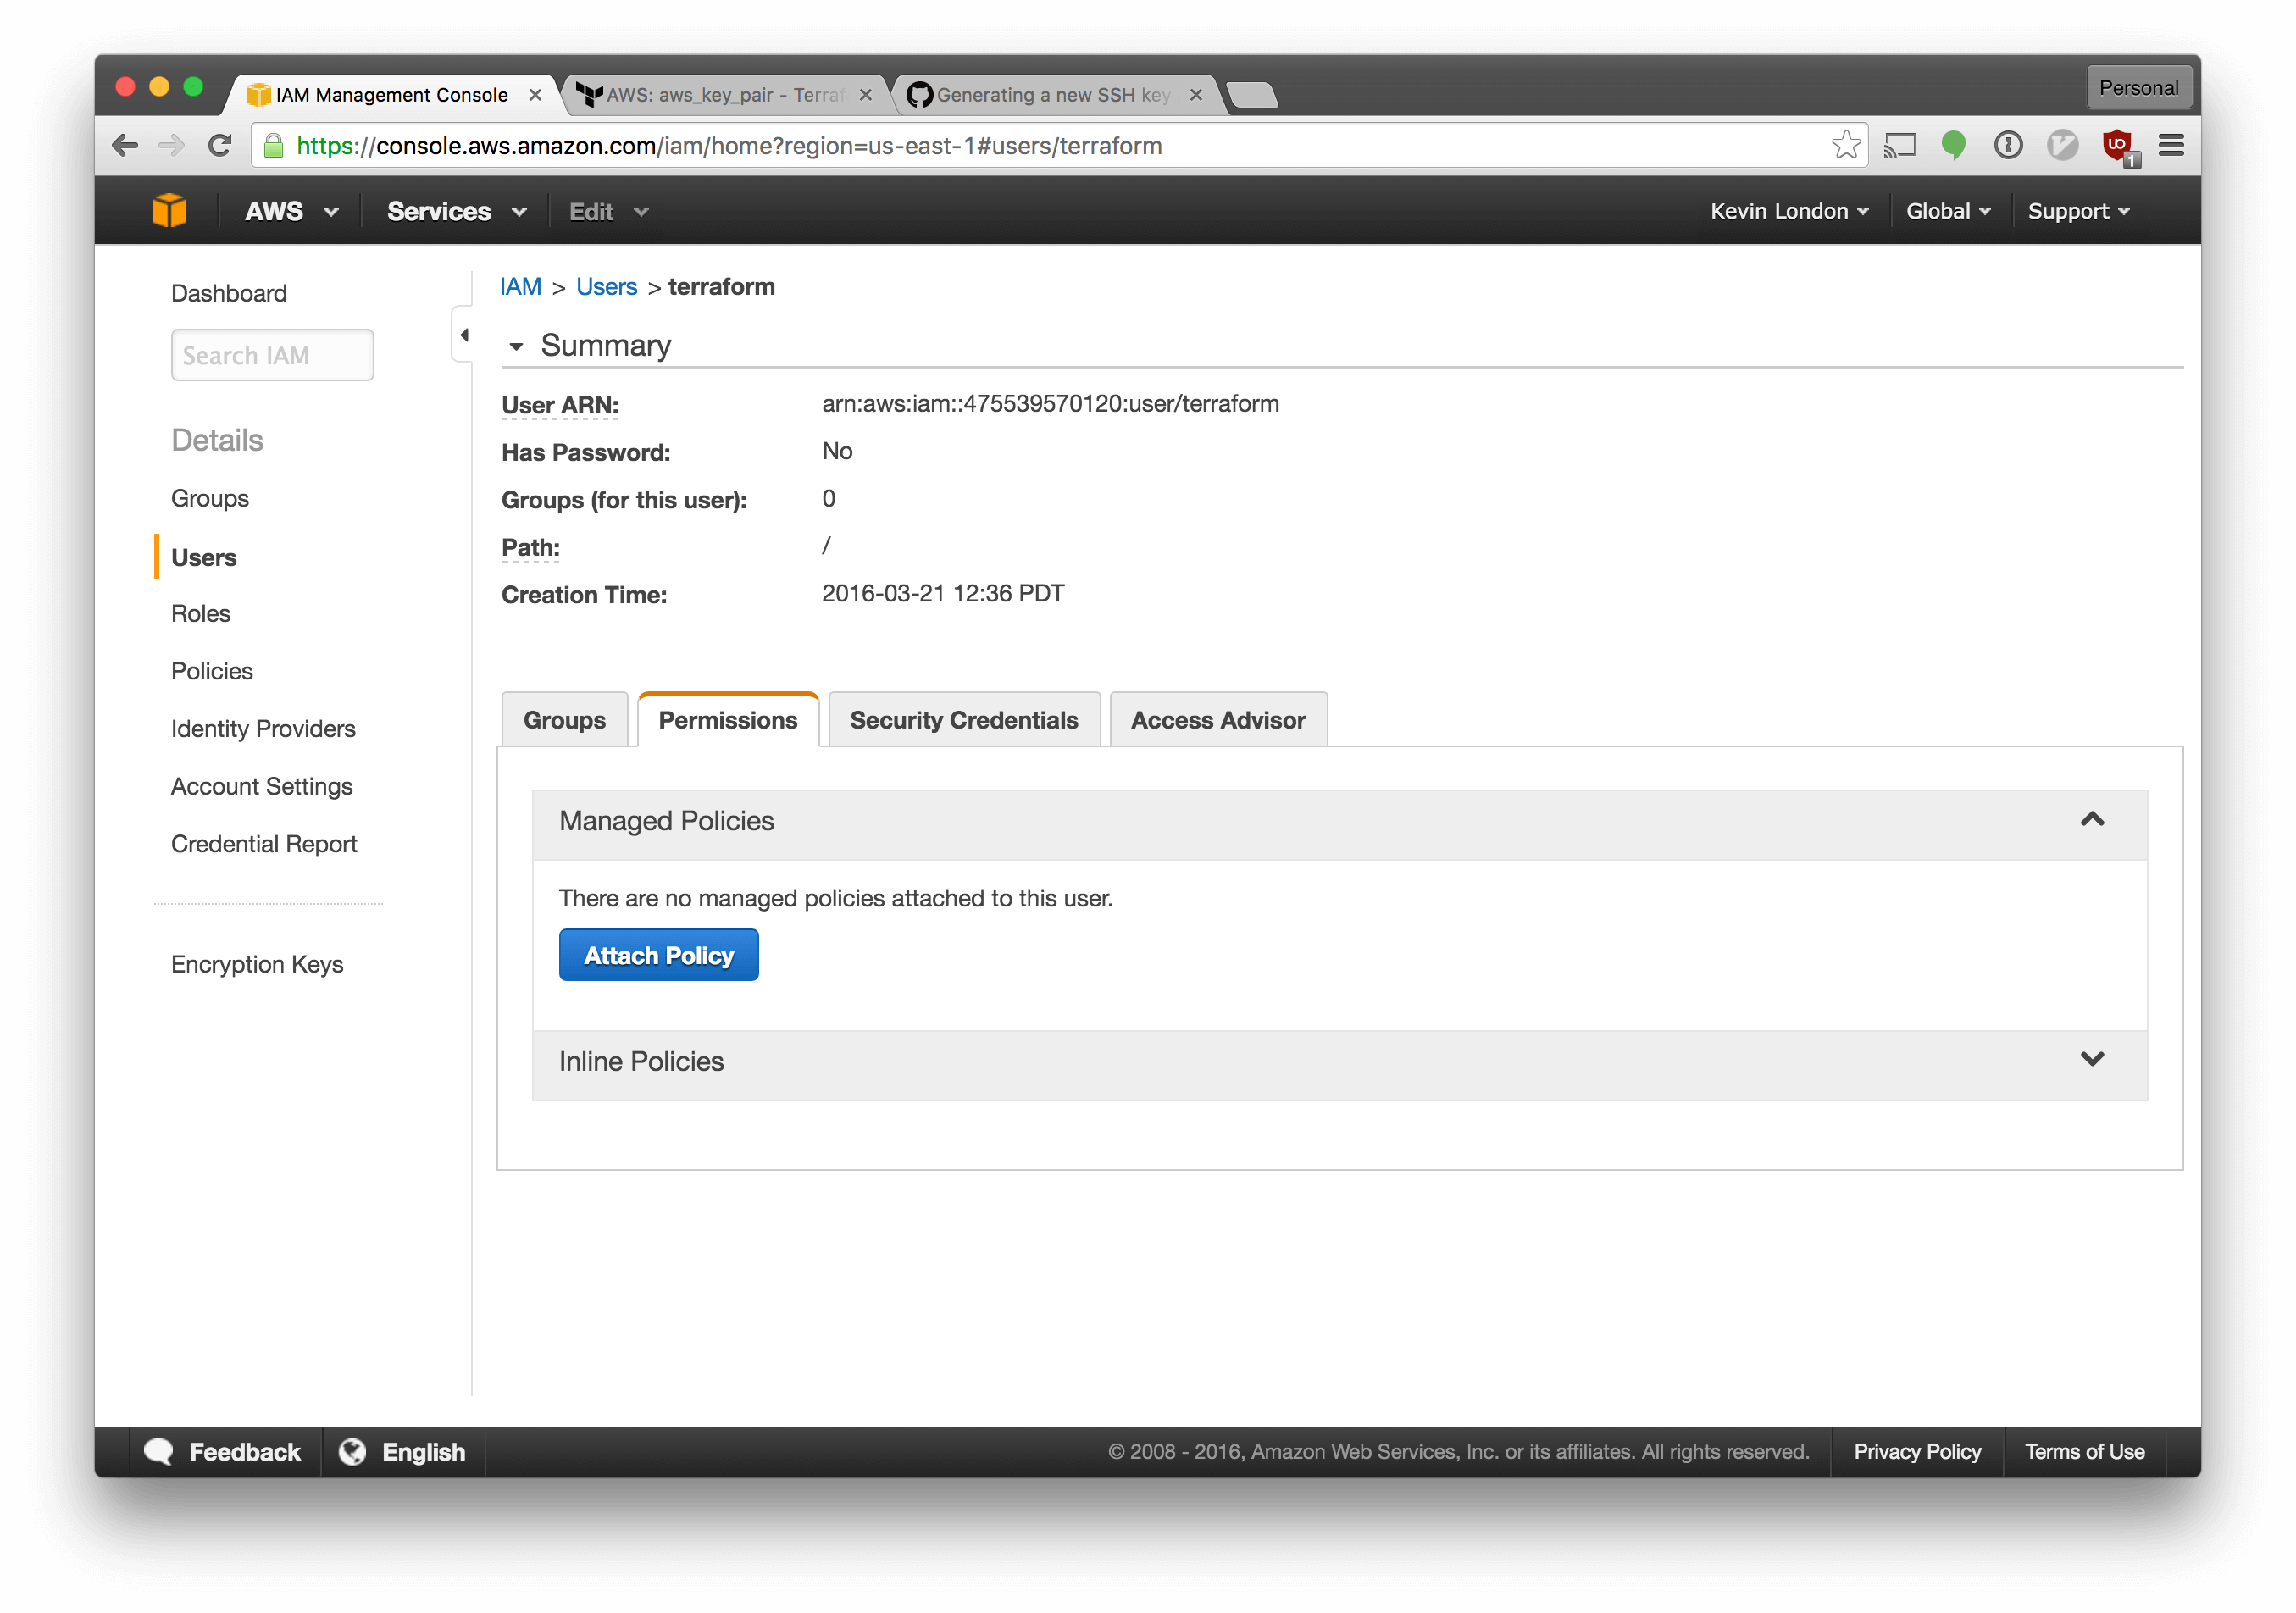
Select the “Permissions” tab, click “Attach Policy” and choose “Administrator” from the dropdown menu. Save your changes.
Finally, to get our keys, go to the “Security Credentials” tab next to the
“Permissions” tab. Click “Create Access Key”. Toggle the dropdown and copy the
values from here into your terraform.tfvars file from earlier.
Great! That’s all the more setup we should need to do. Now that we have our ssh key and the keys we need for AWS, we should be good to go!
To preview the changes we’d make, run terraform plan. You should see something
like this:
$ terraform plan

Refreshing Terraform state prior to plan...


The Terraform execution plan has been generated and is shown below.
Resources are shown in alphabetical order for quick scanning. Green resources
will be created (or destroyed and then created if an existing resource
exists), yellow resources are being changed in-place, and red resources
will be destroyed.

Your plan was also saved to the path below. Call the "apply" subcommand
with this plan file and Terraform will exactly execute this execution
plan.

+ aws_instance.hello_world
    ami:                      "" => "ami-fce3c696"
    availability_zone:        "" => "<computed>"
    ebs_block_device.#:       "" => "<computed>"
    ephemeral_block_device.#: "" => "<computed>"
    instance_state:           "" => "<computed>"
    instance_type:            "" => "t2.micro"
    key_name:                 "" => "<computed>"
    placement_group:          "" => "<computed>"
    private_dns:              "" => "<computed>"
    private_ip:               "" => "<computed>"
    public_dns:               "" => "<computed>"
    public_ip:                "" => "<computed>"
    root_block_device.#:      "" => "<computed>"
    security_groups.#:        "" => "<computed>"
    source_dest_check:        "" => "1"
    subnet_id:                "" => "<computed>"
    tenancy:                  "" => "<computed>"
    vpc_security_group_ids.#: "" => "<computed>"

+ aws_key_pair.hello_world
    fingerprint: "" => "<computed>"
    key_name:    "" => "hello_world"
    public_key:  "" => "ssh-rsa <yourkey> <email>"

+ aws_security_group.web
    description:                          "" => "Allow HTTP connections."
    egress.#:                             "" => "<computed>"
    ingress.#:                            "" => "1"
    ingress.1145654509.cidr_blocks.#:     "" => "0"
    ingress.1145654509.from_port:         "" => "80"
    ingress.1145654509.protocol:          "" => "tcp"
    ingress.1145654509.security_groups.#: "" => "0"
    ingress.1145654509.self:              "" => "0"
    ingress.1145654509.to_port:           "" => "80"
    name:                                 "" => "web"
    owner_id:                             "" => "<computed>"
    vpc_id:                               "" => "<computed>"
Once we’re satisfied with our plan, we can apply it by running terraform apply. Go ahead and do that now.
Getting Our Instance’s IP Address
Awesome! Our server is up. Now we need to set it up using Ansible but, in order to do that, we need to know its ip address. What is its IP? We could find out via the Amazon console, but that stinks.
Let’s use another feature of Terraform: output
variables. We’ll
make one more file in our terraform directory: output.tf. It should look
like this:
This will reference our resources and show us the IP address for our hello world
instance. Run a terraform plan; terraform output and grab your ip. Now, modify your
Ansible inventory hosts file to include the new ip.
Provisioning Our Server
Okay, now that that’s done, we can modify our settings just a little bit for Ansible and be done!
Modify your config to look like this:
Then run ansible-playbook -v site.yml. Type yes at the prompt to confirm
that you’d like to accept the SSH connection to this host.
Once that’s done, your site should be live! Just as importantly, it’s automated! Congratulations!
It can feel like work to automate infrastructure, particularly when the manual steps may only be taken once for a while. It’s valuable to have the automation later, though, and to know how to automate it.
Automating infrastructure when it’s been around for a long time can be painful. It’s hard to migrate an existing environment over to one that’s fully automated and usually requires a complex migration plan.
By starting the automation process early, we save ourselves the work of that cutover later and we get the benefits of automation along the way - a reliable process that’s documented as code.
This is an investment in the future and it also benefits you now.
And it’s up! Hooray!
Next Steps
If you’ve followed along, at this point you have an automated process to provision your infrastructure and set up your servers. There’s so much more we could do!
I find that I learn best when working hands-on. If you’d like some suggestions for projects, here’s what I’d look into for improving what we have:
Dynamic inventory
Ansible can automatically query your AWS inventory to get server IPs and
tags, which can make building the inventory files (e.g. hosts file)
simpler. This is a short one.
Deploys
We already have something that will automatically provision our server. How would we streamline it for deploys? We could separate the steps for provisioning the server (e.g. installing packages, etc) and deploying the actual code (e.g. installing dependencies, updating git repo).
Continuous Integration / Continuous Delivery
It’d be great if we had something that would check that our code works every time we commit to the repository. For that, I’d start with Jenkins. Continuous Delivery builds on that and, once you have tests running automatically, thinks about how to get code ready to deploy automatically. The linked book is an excellent guide to automating infrastructure as well.
Immutable infrastructure
Our setup right now is built on images and on modifying the state of our machines. Another way to think about infrastructure is as immutable. In that case, instead of modifying running machines, you create new machines offline, set them up, and create an image from them. Then, when you deploy new servers, you use the image that you created earlier. As such, the server would not need any changes. If you’d like to get started with this, I’d recommend looking at Packer or…
Docker
We could put our application into a container instead of a VM and make development, at the least, move more quickly. Virtual Machines with Vagrant are fine but using Docker would be better for resource and speed reasons.
Amazon Virtual Private Cloud
We’re currently relying upon the “default” Amazon Virtual Private Cloud, which is kind of like a private datacenter. If we wanted to set up other environments, for example test or staging environments, I think it’s a good idea to use a VPC per environment. We could set this up in Terraform with a little work.
Virtual Environments
We’re manually installing our Python requirements server-wide right now. That wouldn’t work if we wanted to install another application on the server with different requirements. The best practice is to use a virtual environment so that we can separate the packages. If you go down this route, check out Ansible’s pip module, which has an option to install your requirements inside of a virtualenv.
Thanks!
Thanks for reading! Please let me know if you’re interested in reading a follow-up article on one of the suggested topics. If you hit some rough edges, please reach out as well.